Oven Not Turning On? Troubleshooting Guide 2026
If your oven is not turning on, the issue is usually related to power, controls, or safety interlocks but don’t panic, many problems have simple fixes you can try at home.
Quick Answer: Why Your Oven Is Not Turning On
One-Line Summary
If your oven is not turning on, the issue is usually related to power, controls, or safety interlocks but don’t panic, many problems have simple fixes you can try at home.
When This Guide Applies (Electric vs Gas Ovens)
This troubleshooting guide works for both electric and gas ovens. Electric ovens may fail to turn on due to tripped breakers, blown fuses, or faulty heating elements. Gas ovens might not start because of a faulty igniter, closed gas valve, or safety lock. While the cause differs by type, the step-by-step checks in this guide will help you pinpoint the problem and apply safe solutions.
Safety-First Note
Before attempting any repair, always prioritize safety. Do not touch live wires or attempt gas repairs if you’re unsure. Turn off the oven at the breaker or unplug it, wear protective gloves, and ensure the area is ventilated. Some problems, like electrical board failures or gas leaks, should only be handled by certified technicians.
Before You Start: Safety Checklist & Tools
Before diving into troubleshooting why your oven is not turning on, it’s important to prepare properly. Following this checklist will keep you safe and make the process smoother.
Safety Checklist
- Turn off power: Switch off the oven at the breaker panel or unplug it from the wall outlet.
- Shut off gas (for gas ovens): Ensure the gas supply valve is closed to prevent leaks.
- Protective gear: Wear insulated gloves and safety glasses to avoid burns or electric shocks.
- Ventilation: Open windows or doors to prevent gas buildup in case of leaks.
- Clear the area: Remove any flammable items or obstacles around the oven workspace.
Following these simple precautions can prevent accidents and make troubleshooting easier.
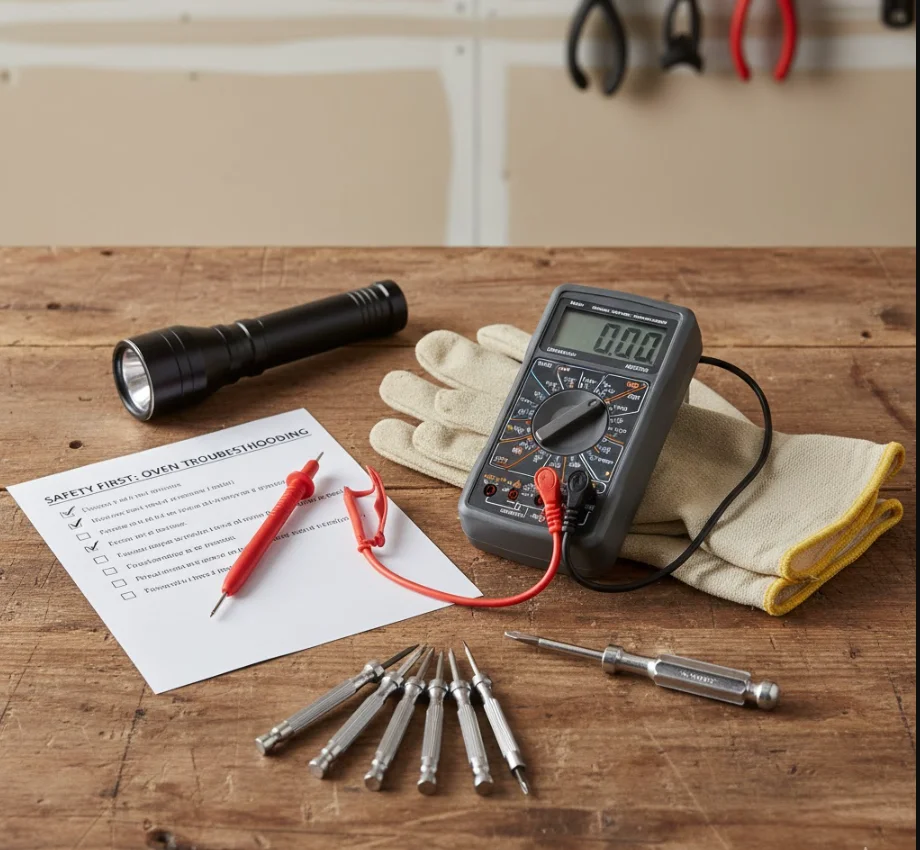
Tools You’ll Need
Having the right tools ready before you start makes diagnosing an oven not turning on much easier. Here’s a basic list:
- Multimeter: For checking voltage, fuses, and continuity of electrical components.
- Screwdriver set: Both Phillips and flat-head for removing panels or access covers.
- Flashlight: To inspect dark interior corners and control boards.
- Oven manual: Helpful for model-specific error codes, diagrams, and reset procedures.
- Notebook and pen: For recording any error codes, observations, or steps you’ve taken.
When to Stop and Call a Pro
While many problems have DIY fixes, some issues are too risky to handle without professional help. Stop immediately and call a certified technician if you notice:
- Electrical sparks or burning smells inside the oven or outlet.
- Gas leaks or strong gas odors never attempt to ignite a faulty igniter.
- Damaged wiring or melted components on the control board.
A professional can safely perform an oven not turning on to fix without risking injury or worsening the problem. Always prioritize safety over saving time.
Step-by-Step Troubleshooting Guide
If your oven is not turning on, follow these steps carefully. Each step includes what to check, how to check it, and what to do next. Most steps are beginner-friendly, but some may require a professional if you’re unsure.
Step 1: Quick Basic Checks (Power & Settings)
Expected time: 5 minutes | Difficulty: Easy
- Check the power connection: Ensure the oven is plugged in (for plug-type ovens) and the outlet is working.
- Verify the power switch: Some ovens have a separate on/off switch to make sure it’s on.
- Check the display: A blank display could indicate no power; an error code may point to a specific problem.
- Test the outlet: Plug in another appliance to confirm the outlet works.
- OK: Oven shows display or responds to controls. Not OK: Oven remains blank and moves to Step 2.
Step 2: Check the Circuit Breaker and Fuses
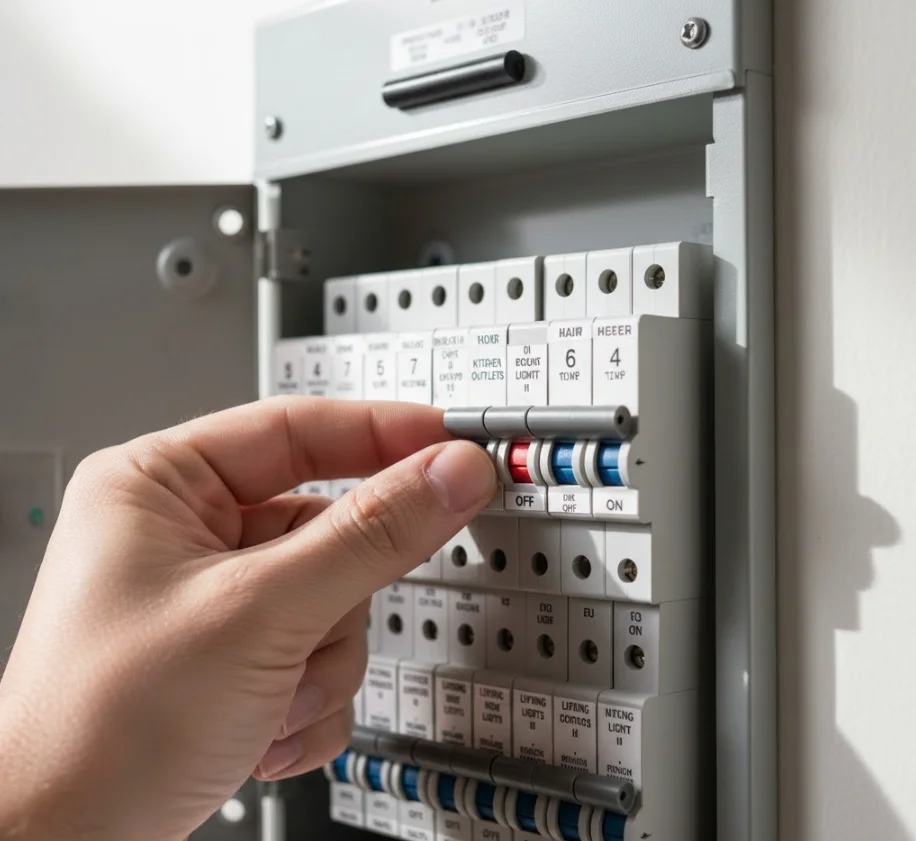
Expected time: 10 minutes | Difficulty: Easy
- Locate your home breaker panel and identify the breaker for the kitchen/oven.
- Reset safely: Turn the breaker off and then back on.
- Blown fuse: If your home uses fuses instead of breakers, replace the blown fuse with the same rating.
- Repeated trips: If the breaker trips again immediately, there may be a short circuit or faulty wiring do not continue DIY, call a professional.
- OK: Oven powers on after resetting.Not OK: Proceed to Step 3.
Step 3: Inspect the Control Panel and Settings

Expected time: 5–10 minutes | Difficulty: Easy
- Check for electronic control lock, demo mode, or delayed start, which can prevent startup.
- Try a soft reset: unplug the oven or switch off at the breaker for 5 minutes, then restore power.
- Refer to the manual for error codes displayed on your control panel note them down for troubleshooting.
- OK: Oven responds to controls.Not OK: Continue to Step 4.
Step 4: Test the Door Latch and Safety Interlock
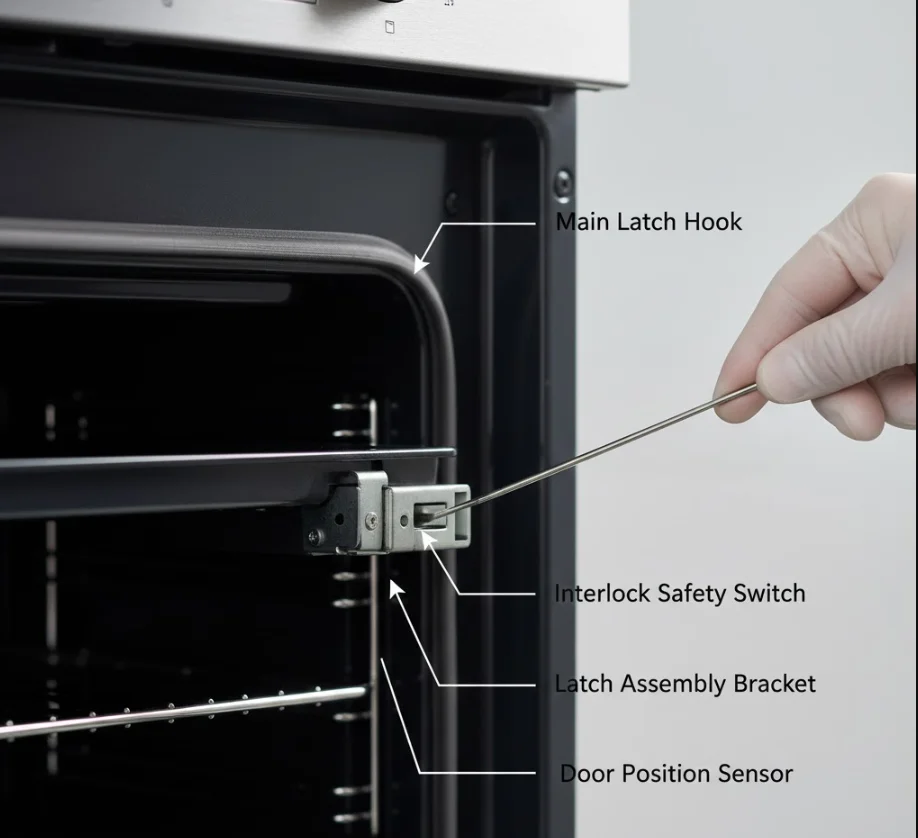
Expected time: 5 minutes | Difficulty: Easy
- Open and close the oven door fully, sometimes a misaligned latch prevents startup.
- Inspect for visible damage or wear on the latch.
- Some ovens allow a manual interlock test (check your manual).
- OK: The oven starts after adjusting the door.Not OK: Move to Step 5 (electric) or Step 6 (gas).
Step 5: Check Heating Elements (Electric Ovens)
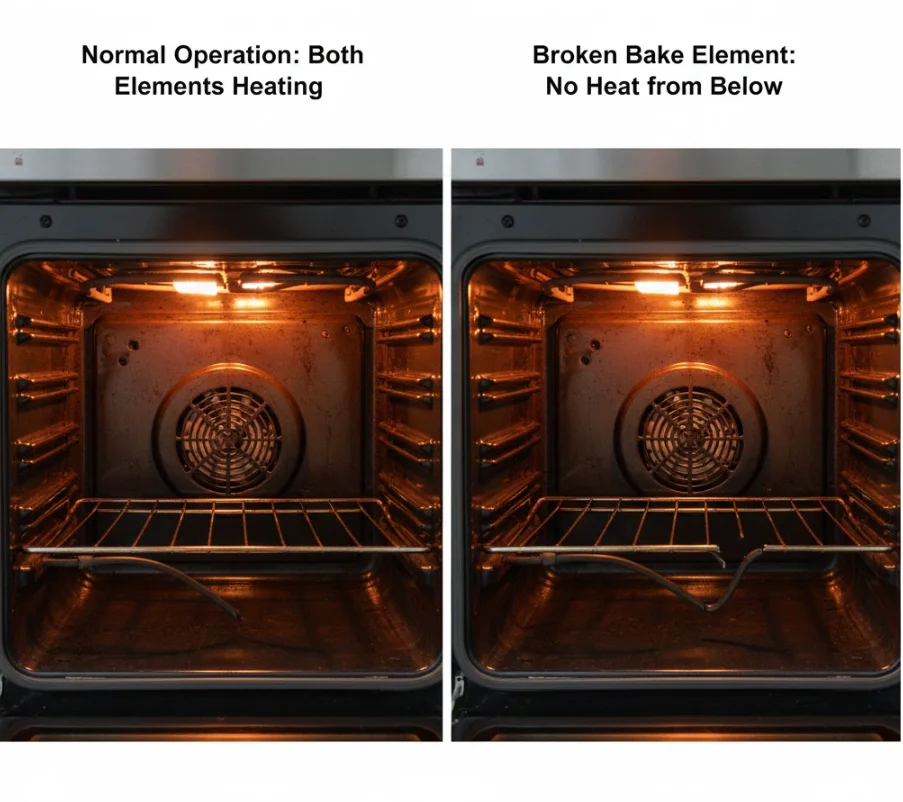
Expected time: 10–15 minutes | Difficulty: Medium
- Inspect bake and broil elements for cracks, breaks, or burn marks.
- Elements should glow red when heating; if not, they may be dead.
- Use a multimeter to test continuity:
- Set meter to resistance/ohms.
- Touch probes to both ends of the element.
- No reading or infinite resistance = element needs replacement.
- OK: Elements intact, multimeter shows continuity.Not OK: Replace defective element or call a professional if unsure.
Step 6: Gas Oven Specific Checks
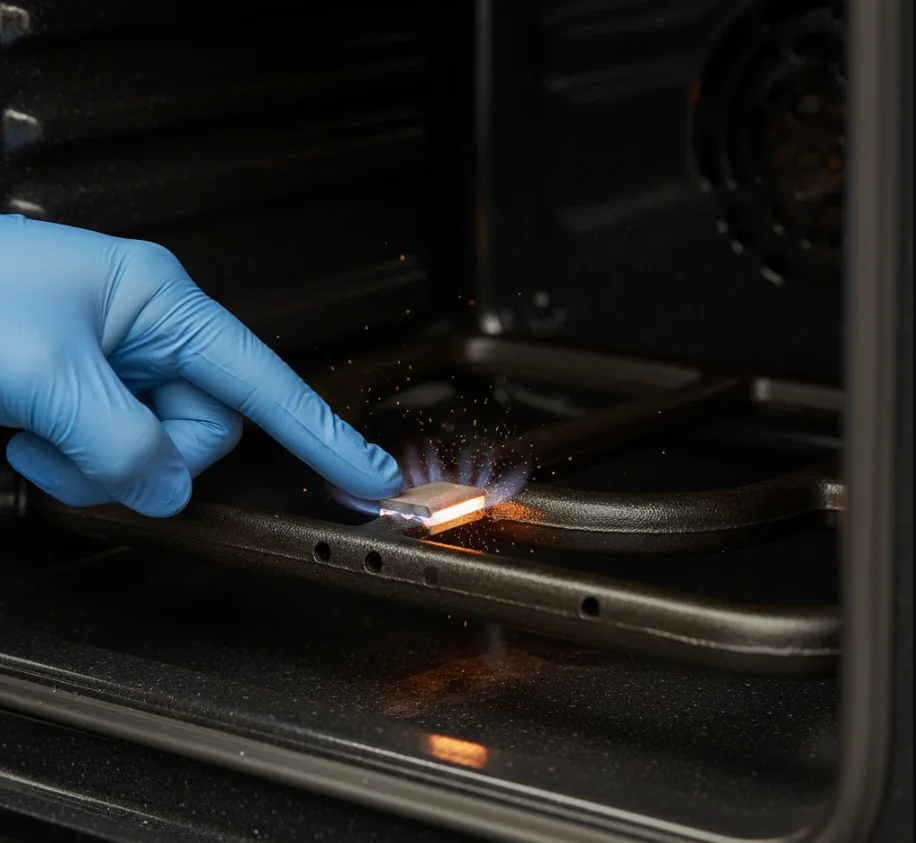
Expected time: 10–20 minutes | Difficulty: Medium
- Confirm gas supply is on and the valve is open.
- Check the igniter or spark ignition:
- Clicking/no spark or weak glow may indicate a faulty igniter.
- Smell of gas: If present, do not attempt to ignite the area and call a certified technician immediately.
- OK: Gas ignites and the oven starts.Not OK: Repair or replace igniter or contact professional.
Step 7: Temperature Sensor and Thermostat Checks
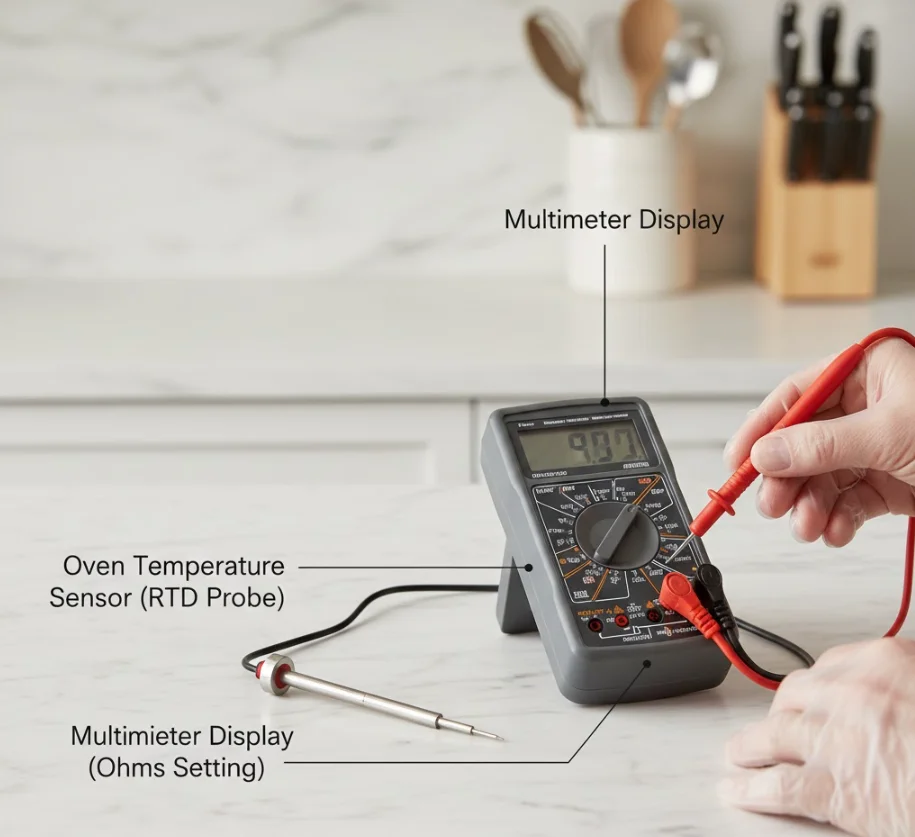
Expected time: 10 minutes | Difficulty: Medium
- A failed temperature sensor may prevent the oven from heating or turning on.
- Use a multimeter to measure resistance at room temperature (usually around 1,000 ohms; check your manual).
- Replace sensor if reading is outside the normal range.
- OK: Sensor resistance is correct.Not OK: Replace sensor or call a technician.
Step 8: Power Board / Control Board Problems
Expected time: 15–30 minutes | Difficulty: Hard / Professional recommended
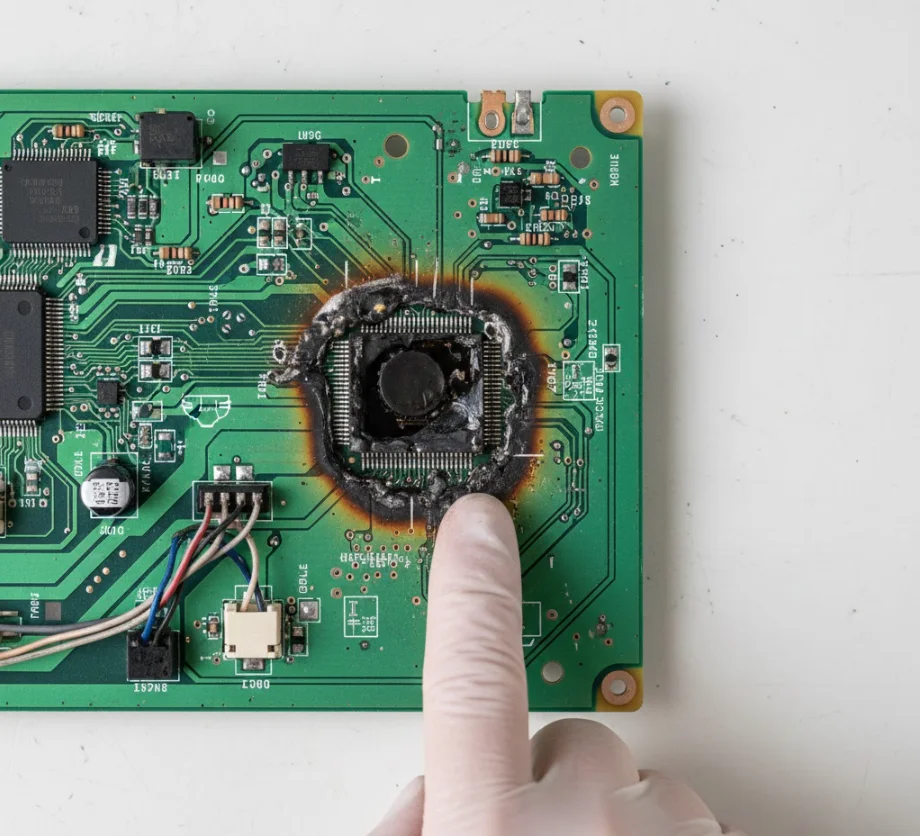
- Inspect the PCB (printed circuit board) for burn marks, melted components, or corrosion.
- Sometimes a board reset fixes software glitches and checks your oven manual.
- If the board is physically damaged, replacement is usually necessary.
- OK: Board functions normally after reset.Not OK: Call a professional for board replacement.
Step 9: Final Quick Fixes to Try
Expected time: 5–15 minutes | Difficulty: Easy–Medium
- Replace tripped fuse or reseat connectors if accessible.
- Reset the control board if your model supports a soft reset or firmware update.
- Verify all previous steps, sometimes repeating Step 1 after a reset resolves the issue.
- OK: Oven powers on and heats properly.Not OK: Likely a more complex electrical or gas issue contact a certified technician.
This guide ensures beginners can methodically troubleshoot why their oven is not turning on and apply a safe oven not turning on to fix solutions.
Diagnostic Flowchart (Visual + Printable Checklist)
A flowchart helps you follow the troubleshooting steps logically and ensures you don’t miss anything when your oven is not turning on. Think of it as a step-by-step map that guides you from simple fixes to more advanced solutions safely.
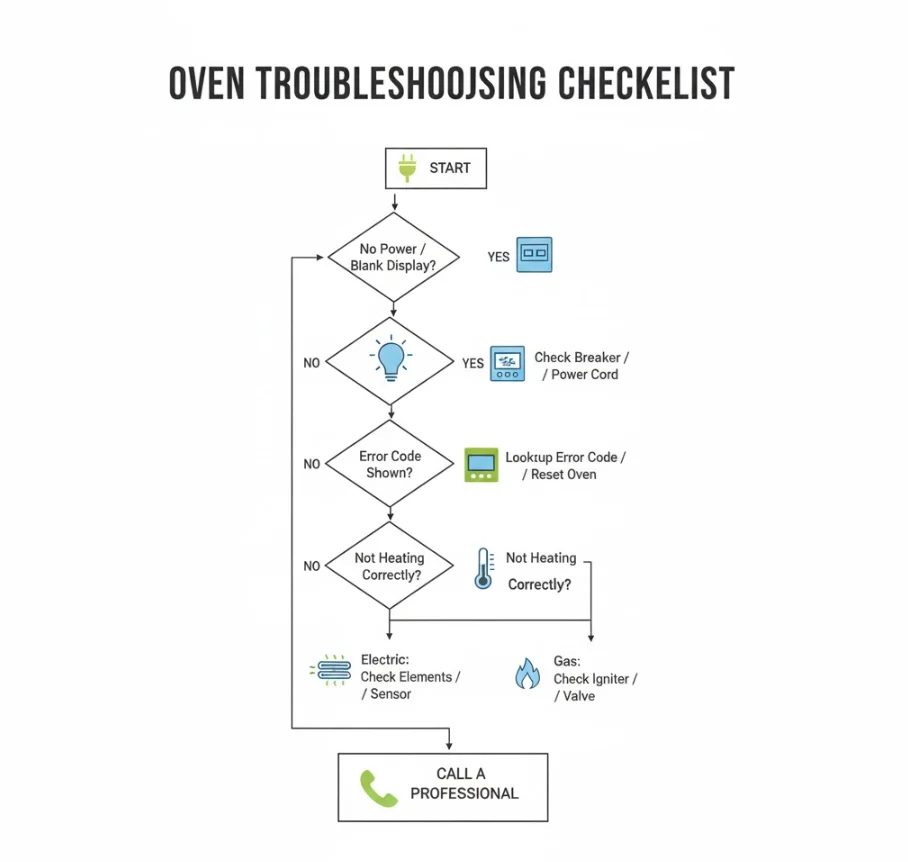
How to Use the Flowchart
- Start at the top: Begin with basic checks like power, outlet, and breaker.
- Follow the arrows: Each “Yes” or “No” answer leads to the next recommended step.
- Mark your progress: Tick off steps as you complete them this prevents repeating tests.
- Stop if unsafe: If the flowchart directs you to potential electrical or gas hazards, call a professional.
- Use it with notes: Record any error codes, observations, or failed components as you go. This helps technicians if you need to escalate the repair.
The flowchart visually separates electric vs gas oven checks, making it easy for beginners to follow the correct path.
Printable Checklist (Copy-Ready Bullet List)
You can print this checklist and keep it near your kitchen when performing an oven not turning on fix:
- Check power connection: Oven is plugged in and outlet works.
- Verify oven switch: Oven’s on/off switch is on.
- Check display: Blank or error code visible? Record code.
- Reset breaker/fuse: Reset or replace as needed.
- Inspect control panel: Unlock demo mode, soft reset if required.
- Test door latch/interlock: Fully closed, undamaged, and operational.
- Electric ovens: Check bake/broil elements for damage or continuity issues.
- Gas ovens: Confirm gas supply, check igniter or spark ignition, do not ignite if gas smell is present.
- Test temperature sensor: Verify resistance matches manual specifications.
- Inspect control board/PCB: Look for burn marks or damage; reset if possible.
- Final quick fixes: Replace tripped fuse, reseat connectors, reset control board.
- Call a professional: If issues persist or unsafe conditions are found.
This printable checklist doubles as a TL;DR guide and ensures you methodically troubleshoot your oven without skipping crucial safety steps.
Common Causes & How to Tell Them Apart
If your oven not turning on, understanding the most frequent causes can save time and help you target the right fix. Here’s a quick reference guide:
No power to oven (outlet/breaker/fuse)
- Symptom: Oven display is blank, no lights or sounds.
- Fix: Check the outlet, reset the breaker, or replace a blown fuse.
Control or electronic failure
- Symptom: Oven displays error codes, buttons are unresponsive, or soft resets don’t work.
- Fix: Try a soft reset first; if a problem persists, the control board may need replacement by a professional.
Failed heating element or igniter
- Symptom: Oven powers on but does not heat; electric elements don’t glow or gas igniter doesn’t spark.
- Fix: Inspect and replace the defective bake/broil element (electric) or igniter (gas).
Faulty door switch or safety interlock
- Symptom: Oven won’t start, or display blinks when the door is closed improperly.
- Fix: Inspect latch/interlock; adjust or replace if damaged.
Temperature sensor/thermostat fault
- Symptom: Oven fails to heat, heats unevenly, or shuts off prematurely.
- Fix: Test sensor resistance with a multimeter and replace if out of spec.
Physical damage / rodent-chewed wiring / water damage
- Symptom: Burn marks, exposed wires, corrosion, or intermittent operation.
- Fix: Do not attempt DIY; call a certified technician to repair or replace damaged wiring/components safely.
Step-by-Step Repair Examples (Mini DIY Tutorials)
If your oven not turning on, some problems are easy to fix safely at home. Below are three common repair examples with step-by-step instructions, estimated time, cost, and skill level.
Example A: How to Reset an Electronic Control Board (Safe Parts)
Estimated time: 5–10 minutes Cost: $0 (if no parts replacement needed) Skill level: Easy
Tools & Materials:
- Screwdriver
- Oven manual (for model-specific instructions)
Steps:
- Turn off power to the oven at the breaker or unplug it.
- Remove any access panel covering the control board (usually at the back of the oven or behind the display).
- Wait 5–10 minutes to allow capacitors to discharge.
- Reconnect power and perform a soft reset by following your oven’s manual instructions (often holding a specific button combination).
- Test the oven if it powers on and heats, the reset fixes the problem.
Tip: If the oven still won’t turn on, the control board may be physically damaged and require replacement by a professional.
Example B: Replace a Broken Bake Element (Electric Oven)
Estimated time: 15–30 minutes Cost: $15–$40 for a replacement element Skill level: Medium
Tools & Materials:
- Screwdriver
- Multimeter (optional, to test continuity)
- Replacement bake element (check oven model number)
Steps:
- Turn off power at the breaker and unplug the oven.
- Open the oven door and remove the old bake element by unscrewing it from the rear wall.
- Carefully disconnect the wiring connectors from the element.
- Test the element with a multimeter for continuity (optional).
- Attach the new element to the wiring connectors.
- Screw it into place and replace the access panel.
- Restore power and test the oven. The element should glow red when heating.
Safety tip: Ensure the wires are not pinched and avoid touching metal parts while the oven is powered on.
Example C: Replace a Faulty Igniter (Gas Oven)
Estimated time: 20–40 minutes Cost: $25–$60 for a replacement igniter Skill level: Medium–High (caution advised)
Tools & Materials:
- Screwdriver set
- Work gloves
- Replacement igniter (model-specific)
Steps:
- Turn off the gas supply and power to the oven.
- Remove the oven racks and access panel to reach the igniter assembly.
- Carefully disconnect the igniter wires.
- Unscrew and remove the faulty igniter.
- Install the new igniter, reconnect the wires, and secure it in place.
- Replace the access panel and racks.
- Turn on the gas and power, then test the oven carefully.
Caution: If you smell gas or notice damaged wiring, stop immediately and call a certified technician. Working with gas carries serious risks, so only attempt this repair if you are confident in your safety skills.
When to Call a Professional (and What to Ask Them)
Sometimes, despite following all troubleshooting steps, your oven not turning on due to complex electrical or gas issues. Knowing when to call a certified technician can save time, prevent damage, and ensure safety.

Red Flags That Need a Certified Technician
Call a professional immediately if you notice any of the following:
- Gas leaks or strong gas smell do not attempt ignition.
- Exposed or frayed wiring inside the oven or control panel.
- Burn marks, melted components, or sparks from the oven.
- Repeated breaker trips even after basic resets.
These issues are hazardous and should never be handled by untrained hands.
Questions to Ask the Repair Service
Before scheduling a visit, prepare a few questions to get clear estimates and ensure quality work:
- What is the estimated cost for labor and parts?
- Are replacement parts covered by warranty or guaranteed?
- How long will the repair take?
- Does the technician provide a safety check after repair?
- Can they give tips to prevent the issue from recurring?
Asking these questions helps avoid surprises and ensures you hire a reputable professional.
How to Document Symptoms for Faster Diagnosis
Providing clear information saves the technician time and improves repair accuracy:
- Take photos of the oven display, error codes, and any visible damage.
- Record unusual smells, sounds, or behavior leading up to the problem.
- Note when the oven last worked properly and any recent events (power outages, spills, or self-cleaning cycles).
Keep this documentation handy when the technician arrives it can shorten diagnosis time and potentially lower the cost of repair.
Tips to Prevent the Problem in the Future
Preventing an oven not turning on is easier than fixing it. A few simple habits and maintenance routines can extend the life of your appliance.
Routine Maintenance Plan
- Regular cleaning: Remove crumbs, grease, and spills from the oven cavity and heating elements.
- Check gaskets and seals: Replace worn door gaskets to ensure proper heat retention.
- Annual inspection: Have a certified technician check the wiring, igniter, and control board annually to catch small issues early.
Smart Habits
- Avoid spills on heating elements: Spilled food can damage the element or sensor.
- Don’t use damaged cords or plugs: Replace frayed cords to prevent short circuits.
- Avoid overloading outlets: Plugging too many appliances into the same outlet can trip breakers.
When to Register Warranty / Extended Service Plan
- Register your oven as soon as you purchase it to activate warranty coverage.
- Consider an extended service plan if your oven is high-end or heavily used this can cover repairs if it suddenly fails.
- Keep all manuals and receipts organized to make claims easier if a problem arises.
Common Mistakes (and How to Avoid Them)
When troubleshooting why your oven not turning on, beginners often make simple mistakes that can cause further damage or safety risks. Knowing what to avoid will save time, money, and prevent accidents.
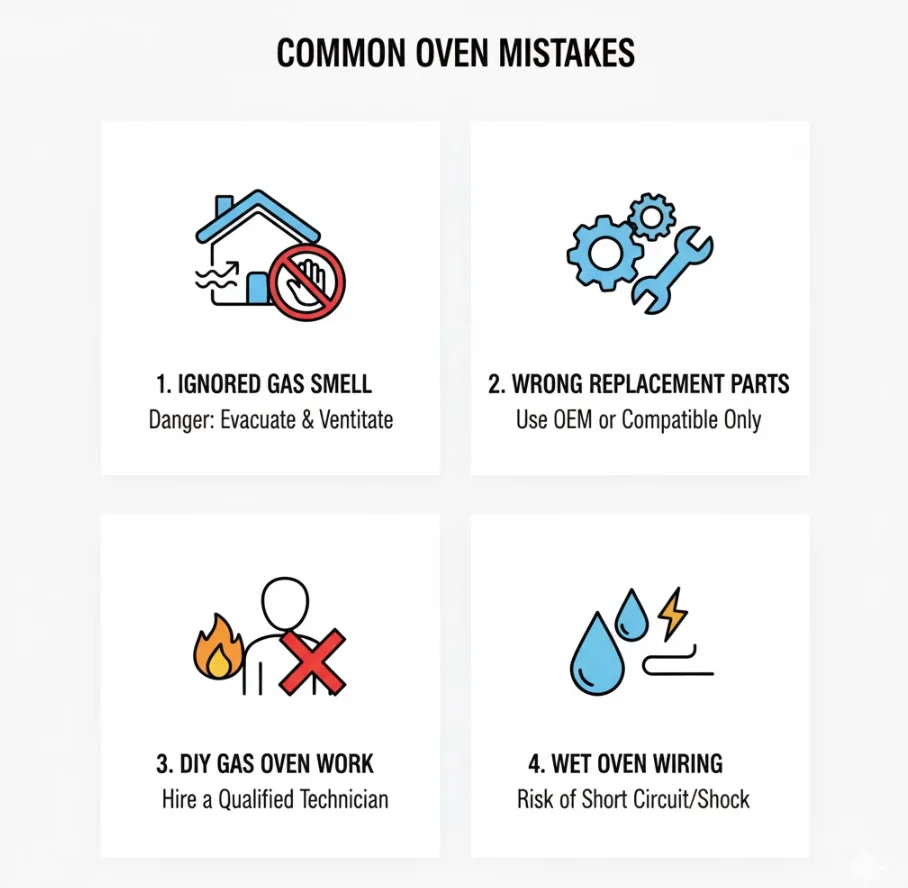
Mistake 1: Ignoring a Faint Burning Smell
Why it’s a problem: A faint burning odor often signals electrical issues, overheating components, or damaged wiring. Ignoring it can lead to serious hazards, including fire.
How to avoid it:
- Always power off the oven immediately if you smell burning.
- Inspect visible wiring, plugs, and connectors for damage.
- Call a professional if the smell persists or you notice any sparks or burn marks.
Mistake 2: Using Wrong Replacement Parts
Why it’s a problem: Installing incorrect heating elements, sensors, or control boards can prevent the oven from functioning and may void the warranty.
How to avoid it:
- Check your oven’s model number before ordering parts.
- Use only manufacturer-approved replacements.
- Compare part numbers and diagrams in your oven manual to ensure compatibility.
Mistake 3: DIY on Gas Lines or High-Voltage Components
Why it’s a problem: Attempting repairs on gas lines or high-voltage electronics without proper training can result in fire, electrocution, or gas leaks.
How to avoid it:
- Never touch gas connections unless you are certified.
- For high-voltage parts (like control boards), turn off power at the breaker and wear protective gloves if inspecting.
- When in doubt, call a licensed technician.
Quick Guidance to Avoid Each Mistake
- Always trust your senses: smells, sounds, and visible damage are early warning signs.
- Use the correct replacement parts and follow manufacturer instructions.
- Respect electrical and gas hazards safety comes first.
- Keep a checklist of steps to follow methodically, reducing the chance of skipped precautions.
Following these simple guidelines helps prevent common errors while performing an oven not turning on to fix, keeping both you and your appliance safe.
FAQs
Why is my oven not turning on but the light works?
This usually means the oven has power but the control board, door latch, or heating element may be faulty. Check the control settings, soft reset the board, and inspect the door latch or elements before calling a professional.
My oven display is blank — what now?
A blank display often indicates no power to the oven, a tripped breaker, or a blown fuse. Start by confirming the outlet works, resetting the breaker, and checking fuses; if the display remains blank, the control board may need attention.
The oven won’t heat but turns on — what’s the difference?
If the oven powers on but doesn’t heat, the issue is typically with the heating elements (electric), igniter (gas), or temperature sensor, rather than power supply. This differs from an oven that won’t turn on, which usually indicates a power or control issue.
Is it safe to reset the breaker myself?
Yes, resetting a household circuit breaker is generally safe if you follow precautions: turn off any connected appliances, stand on a dry surface, and flip the breaker fully off before turning it back on. Stop immediately if the breaker trips repeatedly and call a professional.
How much does an oven repair usually cost?
Repair costs vary depending on the problem: simple fixes like replacing fuses or elements may cost $20–$50, while control board replacements or gas igniter repairs can range from $100–$300. Always request an estimate from a certified technician.
Can I keep using the stove top if the oven won’t start?
If the oven and stove share the same circuit, using the stove may still work, but proceed with caution. Check that the circuit is not overloaded and that the oven issue doesn’t indicate a broader electrical problem.
Will my warranty cover this repair?
It depends on your oven’s manufacturer warranty and coverage terms. Most warranties cover defects in parts and electronics, but damage from misuse, spills, or DIY modifications is typically excluded. Check your manual or contact the manufacturer before attempting any repairs.
Quick Troubleshooting Summary (TL;DR)
Here’s a one-page, easy-to-follow checklist for when your oven not turning on. Use this as a quick reference while performing your oven won’t start fix:
- Check power connection: Oven is plugged in and outlet works. /
- Verify oven switch: Oven’s on/off switch is on. /
- Check display: Blank or error code visible? Record code. /
- Reset breaker/fuse: Reset or replace as needed. /
- Inspect control panel: Unlock demo mode, perform soft reset if required. /
- Test door latch/interlock: Fully closed, undamaged, operational. /
- Electric ovens: Check bake/broil elements for damage or continuity. /
- Gas ovens: Confirm gas supply, check igniter or spark ignition. /
- Test temperature sensor: Verify resistance matches manual specifications. /
- Inspect control board/PCB: Look for burn marks or damage; reset if possible. /
- Final quick fixes: Replace tripped fuse, reseat connectors, reset control board. /
- Call a professional: If issues persist or unsafe conditions are found. /
Keep this checklist handy for a fast, structured approach without missing critical safety steps.
Conclusion & Next Steps
Final Safety Reminder
If your oven not turning on, always prioritize safety first. Avoid touching live wires, attempting gas line repairs without experience, or forcing any components. Following proper safety precautions not only protects you but also prevents further damage to your oven. When in doubt, calling a certified technician is the safest course of action.
Links to Printable Checklist, Manufacturer Support, and Recommended Resources
- Printable Troubleshooting Checklist: Use this step-by-step guide to follow a safe and systematic oven not turning on fix.
- Manufacturer Support: Visit your oven’s official website or manual for model-specific error codes, replacement parts, and warranty coverage.
- Recommended Resources: Online tutorials, safety guides, and appliance repair forums can provide visual guidance and expert tips to resolve common issues safely.
Invite to Comment
Have you tried these steps and your oven not turning on? Share your oven model and describe the symptoms in the comments below. This helps us provide tailored advice and recommend the safest next steps to fix your appliance.