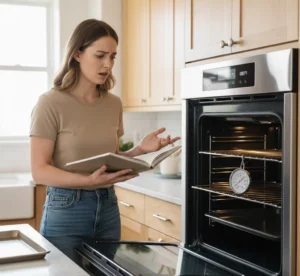
Is your oven not heating up the way it used to? Whether it’s completely cold or just taking forever to warm, this guide will walk you through exactly what’s going on and how to fix it.
When your oven isn’t heating properly, it usually comes down to one of a few common issues: a power supply problem, a faulty heating element, or a temperature sensor that’s gone bad. These are the same culprits behind an electric oven not heating the kind most of us have in our kitchens today.
We’ll focus mainly on electric oven not heating up problems since they’re the most common and easiest to diagnose at home. But don’t worry we’ll also mention specific tips for gas models where relevant.
By the end of this guide, you’ll know:
- How to safely test your oven’s power and heating parts
- The 5 most common fixes for an oven not heating up
- How to check and calibrate your oven temperature
- When it’s time to call a professional
Read time: About 10–15 minutes
Difficulty: Easy to moderate most fixes need only basic tools and a careful eye
 Quick Safety Checklist & Tools
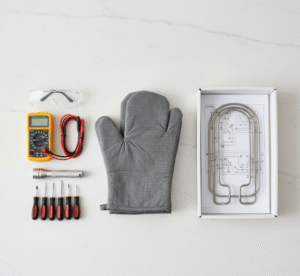 Quick Safety Checklist & Tools
Before you begin troubleshooting your oven not heating up, take a few minutes to prepare your workspace and protect yourself. Most oven fixes are simple but safety always comes first.
Safety First (Must-Do)
Working around electricity and heat requires a little extra care. Here’s what you should always do before starting any repair or inspection:
- Turn off power at the breaker (or unplug freestanding models).
Even if your oven appears off, electricity still runs to certain components. Switching off the breaker ensures you won’t get shocked while testing or replacing parts. - If it’s a gas oven, [Gas Oven vs Electric] check for leaks before doing anything.
If you smell gas, immediately shut off the gas valve, open windows, and leave the area. Do not use electrical switches or lighters and call your gas company or emergency services right away. Safety comes first. - Wear insulated gloves and safety glasses.
Oven interiors and metal edges can be sharp or retain heat. Gloves protect your hands from cuts and burns, while glasses prevent dust or debris from hitting your eyes. - Use a non-contact voltage tester (if available).
Before touching any wire or metal part, use a tester to confirm the circuit is completely dead. This one quick step can prevent a serious accident.
These precautions take less than two minutes but can make a huge difference when fixing an oven not heating up safely and effectively.
Quick Diagnostic Checklist Find What’s Wrong in 5 Minutes
 Quick Diagnostic Checklist Find What’s Wrong in 5 Minutes
Now that you’re prepped and safe, it’s time to figure out why your oven isn’t heating up.
These quick checks will help you spot whether it’s a simple power issue, a failed heating element, or a deeper electrical problem all in under five minutes.
How to Cook Salmon in the Oven
1-Minute Checks (What to Look For)
Start with what you can see and hear, no tools required.
- Is the oven display lit?
- ✅ Yes: You have power move on to the element checks.
- ❌ No: It could be a tripped breaker, blown fuse, or control board issue.
- ✅ Yes: You have power move on to the element checks.
- Are the clock and controls working?
- If your display works but the oven won’t heat, your bake or broil function may have failed separately.
- Is the oven completely cold or slightly warm?
- Completely cold: Usually a power or element issue.
- Slightly warm but never reaches temperature: Often a faulty temperature sensor or control issue.
- Completely cold: Usually a power or element issue.
- Is only one function affected (bake vs. broil)?
- If “Bake” doesn’t work but “Broil” does, your lower heating element is likely bad.
- If both fail, the power supply or thermostat could be the cause.
- If “Bake” doesn’t work but “Broil” does, your lower heating element is likely bad.
- Any visible damage to heating elements?
- Look for blisters, cracks, or dark spots on the lower or upper elements.
- If an element looks burned or broken, it needs replacement.
- Look for blisters, cracks, or dark spots on the lower or upper elements.
Determine Electric vs. Gas Symptoms
Knowing your oven type makes troubleshooting much easier.
- Electric Oven Symptoms
- No red/orange glow from elements during preheat.
- The display and fan might work, but the oven stays cold.
- Often caused by a burnt-out heating element or a bad temperature sensor.
- No red/orange glow from elements during preheat.
- Gas Oven Symptoms
- You may hear clicking or see the igniter glowing faintly but the burner never lights.
- If there’s no glow at all, the igniter or gas valve might be faulty.
- If you smell gas, stop immediately and contact a certified technician.
- You may hear clicking or see the igniter glowing faintly but the burner never lights.
Tip: Gas oven issues are often ignition-related, while electric ovens typically fail at the element or sensor level.
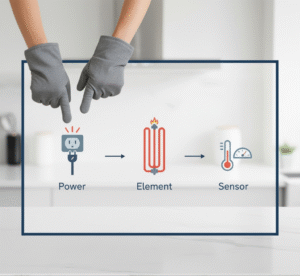
Quick Test Plan (Order to Check)
When diagnosing an oven not heating up, follow this logical order to save time and effort:
- Check the breaker or fuse first.
Reset a tripped breaker or replace a blown fuse. Many heating failures trace back to simple power issues. - Confirm the oven is receiving full power.
Electric ovens need 240 volts. If only half the voltage is supplied, the display may work but the elements won’t heat. - Inspect visible elements next.
Remove racks and check for cracks or breaks in the bake and broil elements. - Test the temperature sensor.
If the elements look fine but the oven won’t reach temperature, use a multimeter to check the sensor’s resistance (you’ll learn how in Fix #3). - Check the control board and wiring last.
If all other parts test fine, the issue may lie in the relay or control board, which can fail silently.
By following this simple flow breaker → power → element → sensor → control board — you’ll identify the problem area quickly without unnecessary part replacements.
Step-by-Step: The 5 Common Fixes for an Oven Not Heating Up
If your oven is not heating up, don’t panic, most problems are easy to diagnose and repair with a few basic tools. Below are the five most common causes and how to fix each one safely.
Whether you have a gas or electric oven not heating, follow these steps in order from simplest to more advanced
Fix #1 Check Power Supply & Circuit Breaker (Easy)
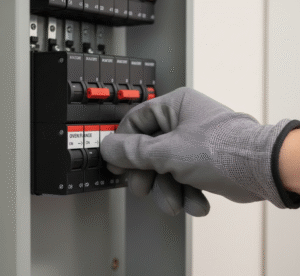 Fix #1 Check Power Supply & Circuit Breaker (Easy)
What’s Happening:
Your oven may not be getting enough electricity to power the heating elements. Even a half-tripped breaker can cause your oven not heating up completely.
What to Expect:
- Blank or flickering display
- No interior light
- Oven stays cold or only slightly warms
Steps to Fix:
- Turn off your oven and head to your home’s breaker panel.
- Look for a tripped or partially flipped breaker labeled “oven” or “range.”
- Reset it fully off and then back on.
- For freestanding units, check the power plug and outlet for looseness or burns.
- If it’s a built-in model, a qualified technician may need to inspect the internal wiring.
How to Verify It’s Fixed:
The display powers on, the oven light works, and preheating begins normally.
Time & Cost: 5–10 minutes, $0–$50.
Pro Tip: Many “no-heat” calls turn out to be just a tripped breaker. Always start here first.
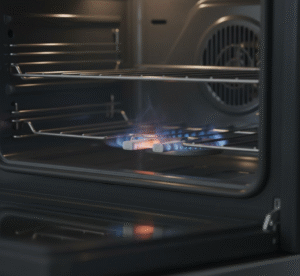
Fix #2 Inspect and Test Heating Elements (Electric) (Moderate)
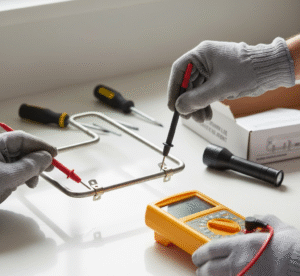 Fix #2 Inspect and Test Heating Elements (Electric) (Moderate)
What’s Happening:
In most cases, an electric oven not heating is due to a burnt-out bake or broil element the metal coils that glow red when working correctly.
Symptoms:
- Oven turns on but doesn’t heat
- Lower or upper element looks cracked, blistered, or broken
- Uneven baking or long preheating times
Tools Needed:
Screwdriver, multimeter, work gloves.
Steps to Fix:
- Turn off power at the breaker.
- Remove oven racks and locate the bake element at the bottom.
- Visually inspect for damage or breaks.
- Unscrew and disconnect the element.
- Use a multimeter to test continuity (should read 10–100 ohms).
- Replace if faulty and reconnect the wires securely.
How to Verify It’s Fixed:
Preheat to 350°F and look for a glowing red element within minutes.
Time & Cost: 20–45 minutes, $20–$80.
Pro Tip: Always match your oven’s model number when ordering replacement elements.
Fix #3 Test or Replace the Oven Temperature Sensor (Moderate)
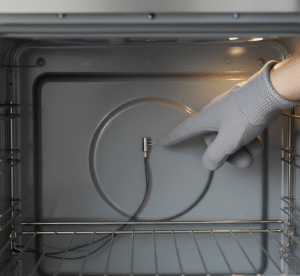 Fix #3 Test or Replace the Oven Temperature Sensor (Moderate)
What’s Happening:
A faulty temperature sensor or thermostat can prevent the oven from reaching set temperatures, a common reason your oven is not heating up properly.
Symptoms:
- Oven powers on but never gets hot enough
- Temperature fluctuates
- Food undercooked even after full bake time
Steps to Fix:
- Turn off power.
- Locate the temperature sensor (usually at the back of the oven’s interior).
- Remove screws and gently pull it forward.
- Test resistance with a multimeter should read about 1,080 ohms at 70°F.
- If readings are off, replace the sensor.
- Reinstall and test by preheating the oven again.
How to Verify It’s Fixed:
The oven reaches target temperature within the usual preheat time (7–10 minutes).
Time & Cost: 15–45 minutes, $15–$70.
Pro Tip: Some newer models let you recalibrate temperature without replacement check your manual first.
Fix #4 Check Control Board, Relays & Thermal Fuse (Advanced)
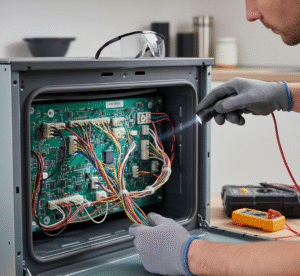 Fix #4 Check Control Board, Relays & Thermal Fuse (Advanced)
What’s Happening:
If all else looks fine but your oven not heating up persists, the issue could lie in the electronic control board, relay connections, or a blown thermal fuse.
Symptoms:
- Display works but oven won’t heat
- Random shut-offs or error codes
- Intermittent heating performance
Steps to Fix:
- Disconnect power completely.
- Refer to your manual for error codes — they often point directly to the failed part.
- Remove the back panel and inspect for burnt spots or loose wires.
- Test the thermal fuse for continuity.
- Replace the control board or relay module if confirmed defective.
Safety Note: This step involves high-voltage components if unsure, call a professional.
Time & Cost: 30–120 minutes, $80–$400+.
Fix #5 Gas Oven Specific: Igniter or Gas Supply (Advanced)
 Fix #5 Gas Oven Specific: Igniter or Gas Supply (Advanced)
What’s Happening:
For gas ovens, ignition failure is the top reason for your oven not heating up.
Symptoms:
- Clicking sound but no flame
- Weak orange glow from igniter
- Smell of gas without ignition
Steps to Fix:
- Turn off the gas supply and unplug the oven.
- Check that the gas valve is open.
- Look at the igniter it should glow bright orange within 30 seconds of starting.
- If not glowing, or glowing weakly, replace the igniter.
- Never attempt deeper gas line repairs yourself.
Safety Tip: If you smell gas, stop immediately and contact emergency services.
Time & Cost: 30–60 minutes, $50–$150 for parts.
 After-Repair Checks & Calibration
 After-Repair Checks & Calibration
Once you’ve repaired the issue causing your oven not heating up, it’s important to confirm everything works correctly before regular use. These quick post-repair checks ensure your oven heats evenly and accurately so your food comes out perfect every time.
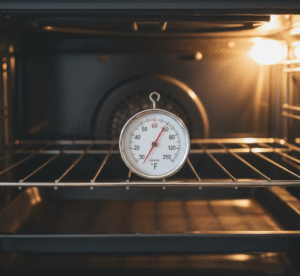
1. Run a Preheat Test with an Oven Thermometer
Even if your display says “350°F,” that doesn’t always mean the actual temperature inside matches.
What to do:
- Place a standalone oven thermometer in the center rack.
- Set your oven to 350°F (or 180°C) and let it preheat completely.
- Once it beeps “ready,” wait another 10–15 minutes ovens often overshoot or undershoot during initial heating.
- Open the door quickly and check the thermometer reading.
What you’re looking for:
- ±15°F difference from your set temperature is normal.
- More than 25°F off? You’ll need to calibrate the oven (explained below).
2. Test Bake & Broil Cycles for 15–30 Minutes
This ensures that both your bake and broil elements (or burners, for gas ovens) are functioning properly and maintaining steady heat.
Steps:
- Run a Bake cycle at 350°F for 20–30 minutes.
- Check that the temperature holds steady and doesn’t fluctuate wildly.
- Check that the temperature holds steady and doesn’t fluctuate wildly.
- Then switch to Broil mode for 5–10 minutes.
- The top element should glow red or the gas flame should light evenly.
- The top element should glow red or the gas flame should light evenly.
- If either function doesn’t heat, revisit Fix #2 or #4 an element or control board may still be faulty.
3. Map Your Oven’s Temperature Zones
Most ovens have hot and cool spots that’s normal.
But large differences can cause uneven baking, especially for delicate recipes.
Try this simple temperature mapping test:
- Place three oven thermometers (or move one between positions):
- One in the center rack
- One top
- One bottom
- One in the center rack
- Preheat to 350°F and let it stabilize for 10 minutes.
- Record the readings for each spot.
Results:
- A 5–15°F variation between zones is acceptable.
- Over 25°F difference? Clean your fan and vents, and ensure air circulation isn’t blocked by baking trays or foil.
4. Calibrate Your Oven (If Needed)
If your oven consistently runs too hot or too cold, it probably just needs temperature calibration not another repair.
For most digital ovens:
- Press and hold “Bake” until “0°F” appears (or follow your brand’s calibration setting in the manual).
- Use the arrow keys to adjust the temperature:
- + or – 5°F increments, up to ±35°F total.
- + or – 5°F increments, up to ±35°F total.
- Press Start or Enter to save.
For dial-style ovens:
- Note the variance and simply compensate manually (e.g., set to 365°F if it runs 15° cool).
Tip: Always re-test after calibration with a thermometer to confirm accuracy.
Pro Tip: If your oven temperature still drifts more than ±30°F after calibration, the sensor or control board may still be misreading. At that point, it’s best to call a technician for deeper diagnostics.
 Tips & Preventive Maintenance (Quick Wins)
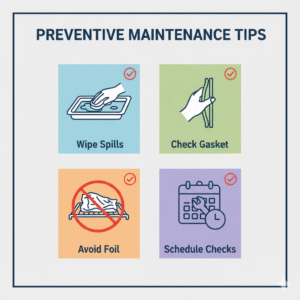 Tips & Preventive Maintenance (Quick Wins)
Keeping your oven healthy doesn’t require fancy tools, just a few smart habits.
These simple tips can help prevent heating problems, extend your oven’s life, and keep your bakes perfectly even.
1. Keep Heating Elements Clean
When spills or grease drip onto your oven’s bake or broil elements, they can burn on, creating smoke, odor, and uneven heating.
Over time, residue buildup can even cause an element to short out.
Quick Win:
- After your oven cools completely, wipe the elements gently with a damp cloth or sponge.
- Avoid harsh scrubbing or metal brushes; they can damage the surface coating.
- For heavy buildup, use a non-abrasive cleaner or a vinegar-and-baking-soda paste.
2. Use an Oven Thermometer Regularly
Even brand-new ovens can drift off temperature by 10–20°F.
A small oven thermometer can be your best friend for catching issues early.
Quick Win:
- Keep a thermometer on the center rack at all times.
- Check it every few weeks if readings are off by more than ±15°F, recalibrate (see the previous section).
- Helps ensure consistent results for baking, roasting, and meal prep.
3. Don’t Use Foil on the Oven Floor
It might seem like a neat trick for easy cleanup, but lining your oven floor with foil can cause more harm than good.
Why it matters:
- Foil reflects and traps heat, which can overheat the lower element.
- It can melt or fuse to the enamel surface, permanently damaging it.
Quick Win:
Use a removable oven liner tray on the lower rack instead it catches spills safely and is easy to wash.
4. Check Door Gasket & Hinges Regularly
A loose or worn-out door seal allows heat to escape, forcing the oven to work harder or never reach temperature at all.
Quick Win:
- Every few months, inspect the rubber gasket around the door.
- Look for cracks, tears, or food buildup.
- If the door doesn’t close tightly or feels uneven, the hinges may need tightening or replacement.
Pro Tip: A tight seal saves energy and ensures your food cooks evenly.
Common Mistakes to Avoid
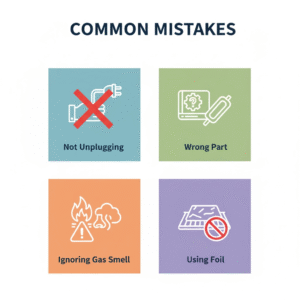 Common Mistakes to Avoid
When your oven is not heating up, it’s tempting to jump straight into repairs but that’s exactly where most people make mistakes. Avoid these common slip-ups to save time, money, and possible injury.
1. Not Turning Off Power Before Touching Components
This is the #1 safety mistake. Ovens draw high voltage, and even a “switched off” control panel can still carry live current.
Why it’s a problem:
Touching wires or heating elements without disconnecting power can cause electric shock or serious injury.
Do this instead:
- Always turn off the oven at the breaker (not just the front control).
- Wait a few minutes for capacitors to discharge before handling internal parts.
- If it’s a gas oven, also shut off the gas supply valve for extra safety.
2. Replacing the Wrong Part
Many DIYers guess the faulty part then order a new heating element or sensor without confirming.
Why it’s a problem:
You might replace a working component while the real issue (like a bad relay or sensor wire) remains. That’s wasted time and money.
Do this instead:
- Always test components with a multimeter before buying replacements.
- Look up your oven’s exact model number (usually found inside the door frame).
- Order OEM (original equipment manufacturer) parts for best fit and reliability.
3. Overlooking Simple Power Problems
It’s easy to jump to “something’s broken” when your oven won’t heat but often it’s just a tripped breaker or loose plug.
Why it’s a problem:
Skipping the basics means you might spend hours troubleshooting a part that works perfectly fine.
Do this instead:
- Always start with power checks first (outlet, cord, breaker).
- For hardwired ovens, check that the wiring block isn’t loose or burnt.
- Save yourself the hassle; simple checks can fix the issue 30% of the time.
4. Ignoring Gas-Safety Signs
If you smell gas, hear a hissing sound, or your igniter glows but the burner doesn’t light stop immediately.
Why it’s a problem:
Continuing to test or repair a gas appliance in this condition risks a fire or explosion hazard.
Do this instead:
- Shut off the gas line and unplug the oven right away.
- Open windows to ventilate.
- Call a certified gas technician for inspection before turning it back on.
Safety first, always.
5. DIYing Complex Control-Board Repairs Without Experience
The oven’s control board is like its brain full of delicate circuits and relays. One wrong connection can fry the board or short your entire system.
Why it’s a problem:
Replacing or soldering on a control board without training can cause more damage than the original fault.
Do this instead:
- Only attempt control-board replacement if you’re comfortable handling electronics.
- Always photograph wire placements before removal.
- If you see burnt marks, melted connectors, or can’t identify the issue call a professional.
Pro Tip: The best way to fix an oven not heating up is by starting simple, test the basics first, then move to advanced parts only when necessary.