Quick Overview – How to Install a Wall Oven
What this guide covers:
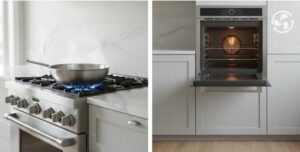
This beginner-friendly tutorial walks you through how to install a wall oven safely and correctly from measuring the cabinet and preparing the wiring to testing your new unit after setup. You’ll learn every step needed to go from unpacking the oven to a finished, ready-to-use installation.
Who this guide is for:
This guide is designed for homeowners or DIY enthusiasts who want to understand the install wall oven step by step process without feeling overwhelmed. Whether you’re replacing an old built-in oven or installing a new one during a remodel, these instructions will help you do it confidently.
How to Dehydrate Fruit in the Oven
Estimated time, difficulty, and skill level
- Time required: 2–3 hours for a standard electric wall oven
- Difficulty: Moderate (basic electrical knowledge helpful)
- Recommended skill set: Comfortable with using power tools, measuring accurately, and following safety precautions
Safety first
Before you begin, turn off the power to your oven circuit at the main breaker panel. Always check local electrical and building codes. Some regions require a licensed electrician for hardwired connections. Wear safety gloves and eye protection, and ensure your workspace is clear of obstacles before starting.
Tools, Materials & Safety Gear for How to Install a Wall Oven
Before starting your how to install a wall oven project, gather all your essential tools, parts, and safety gear. Having everything ready ensures a smoother and safer installation process.
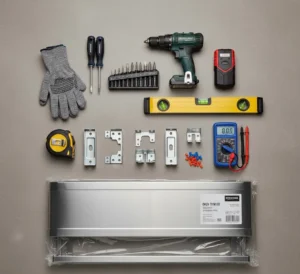
Tools You’ll Need
To install a wall oven step by step, keep these basic tools within reach:
- Screwdrivers (Phillips & flathead): For removing and securing panels and trim.
- Power drill with bits: To create pilot holes and mount brackets securely.
- Multimeter: To verify power is off before working on electrical connections.
- Level: Helps ensure your oven sits perfectly straight inside the cabinet.
- Stud finder: To locate support points for mounting brackets.
- Socket set or wrench: For tightening bolts and securing brackets.
- Clamps or support boards: To stabilize the oven while positioning it.
Pro Tip: Use a magnetic screwdriver and cordless drill to make installation faster and more precise.
Materials & Parts Checklist
Having the right materials is just as important as tools when learning how to install a wall oven correctly. Here’s what you’ll need:
- Wall oven unit (verify model compatibility and dimensions)
- Mounting screws and brackets (often included with oven)
- Trim kit for a finished look
- Electrical cable or wire harness
- Wire connectors or wire nuts
- Heat-resistant sealant or insulating tape (optional for airtight sealing)
- Optional additions: wood shims for cabinet leveling, additional framing blocks for support, or cable clamps for tidy wire routing.
Safety Gear Essentials
Even for a simple install of a wall oven step by step job, safety comes first. Make sure you have:
- Insulated work gloves protect against sharp edges and electrical wires.
- Safety glasses or goggles prevent debris or sparks from reaching your eyes.
- Dust mask – useful if you’re drilling into wood or drywall.
- Closed-toe shoes – to protect feet when lifting or sliding the oven into place.
Reminder: Always disconnect power at the circuit breaker before touching any electrical components.
Before You Begin: Checks & Preparation
Before diving into how to install a wall oven, a few pre-installation checks can save hours of frustration and ensure your setup meets safety standards.
Confirm Oven Model Requirements
Different models have unique cutout dimensions, weight, and ventilation needs. Check your manufacturer’s manual to confirm the:
- Recommended cabinet cutout size (height, width, and depth)
- Oven’s weight rating and whether your cabinet can handle it
- Required ventilation clearance behind and above the unit
Tip: Always use the template or installation sheet provided with your oven for accurate placement.
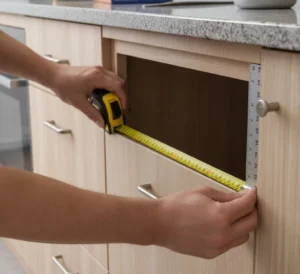
Measure the Cabinet Opening
Proper measurements are critical when learning how to install a wall oven step by step. Use a tape measure to check:
- Width: Cabinet opening should match the oven’s specifications.
- Height: Leave extra room for trim and top airflow.
- Depth: Ensure the oven won’t stick out past your cabinetry.
- Clearance: Allow a few inches at the back for air circulation and wiring.
Record these dimensions before unboxing the oven to confirm it fits.
Check Power Supply and Electrical Requirements
Every way to install a wall oven project involves safe electrical setup. Verify:
- The voltage and amperage match your oven’s requirements (typically 240V).
- The oven is on a dedicated circuit to prevent overloading.
- Whether it needs hardwiring or a plug-in connection (check manual).
- The breaker is switched OFF and tested with a multimeter for zero voltage.
If unsure about electrical wiring, consult or hire a licensed electrician before proceeding.
Permits, Codes, and Building Inspections
Depending on your area, installing a built-in oven may require following local electrical or building codes. Check for:
- Permit requirements for electrical work.
- Inspections if your installation alters existing wiring.
- Warranty rules some brands void coverage if not installed to code.
Being compliant keeps your home safe and prevents issues during resale or warranty claims.
Create a Step Checklist & Clear the Workspace
Before you officially begin installing your wall oven step by step, organize your space:
- Remove any nearby appliances or obstacles.
- Lay down a soft blanket or cardboard to protect floors.
- Keep your tools organized in reachable zones.
- Make a simple step checklist (unboxing → wiring → mounting → testing) to stay on track.
Pro Tip: Mark cabinet edges with painter’s tape to protect them while sliding the oven in.
Step-by-Step Installation Guide: How to Install a Wall Oven
Now that you’ve prepared your tools, cabinet, and wiring, it’s time to follow this step by step guide. Always check the manufacturer’s manual first; your oven model may have specific installation requirements.
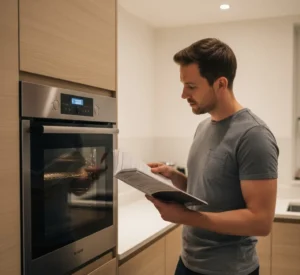
Step 1: Unbox and Inspect the Oven
Begin by carefully unboxing your oven. Remove all packaging materials and inspect the unit for dents, scratches, or damaged wires. Confirm all accessories are present such as the trim kit, mounting brackets, and screws. Before you continue, read the quick-start or installation section of the manual. Knowing your model’s wiring type and dimensions is key when learning to install a wall ovens correctly.
Tip: Keep the oven door closed and latched during movement to prevent damage to hinges or glass.
Step 2: Remove Existing Cabinet Face or Old Unit (If Applicable)
If you’re replacing an old oven, disconnect it from the power first. Then remove the trim panels or faceplate using a screwdriver. Slide the old oven out slowly. It may be heavy, so have someone assist you. Disconnect the electrical wiring or plug once the oven is safely supported on a sturdy surface. This step ensures your space is ready for the next part of the install wall oven step by step process.
Step 3: Prepare the Cabinet and Cutout
Measure the cabinet opening again to confirm it matches your oven’s cutout dimensions. Reinforce weak cabinet areas with wood blocks or braces to support the oven’s weight. If needed, trim excess wood or adjust framing for a snug, even fit. Proper cabinet prep is one of the most critical steps in installing a wall ovens ensuring your oven aligns level and flush.
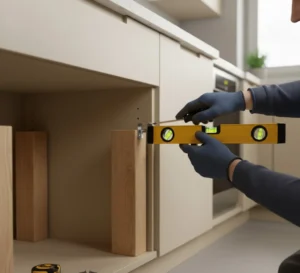
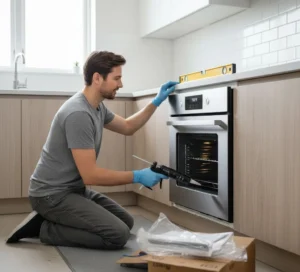
Pro Tip: Use a level to verify the base is perfectly horizontal before placing the oven.
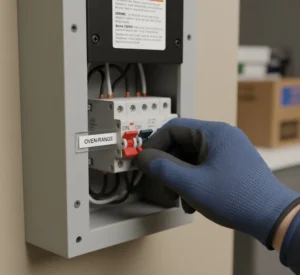
Step 4: Prepare the Electrical Supply (Safety First)
Turn off the power at the main breaker. Double-check with a multimeter to confirm there’s no live current. Label your electrical wires (L1, L2, ground, neutral) so you can reconnect correctly. Inspect for damaged insulation or frayed ends. If your installation requires hardwiring or you’re unsure about circuit load call a licensed electrician. Electrical safety is non-negotiable in any installation of a wall ovens project.
Step 5: Install Mounting Brackets and Supports
Locate the oven’s mounting points as shown in the manual. Use a pencil to mark where screws and brackets will go. Drill small pilot holes, then secure the brackets firmly into cabinet studs or reinforcement blocks. A well-anchored bracket will prevent shifting or vibration when the oven is used. This step ensures your install wall oven step by step process stays stable and long-lasting.
Step 6: Lift, Position, and Slide the Oven into Cutout
Wall ovens are heavy, ask for help or use a small platform dolly. Lift evenly from both sides and slide the oven gently into the cabinet opening. Align the rails or bracket tabs as you slide it in. The oven should sit flush with the cabinet face without gaps or pressure on wiring. This is one of the most satisfying moments in how to install a wall oven, so take your time to align it perfectly.
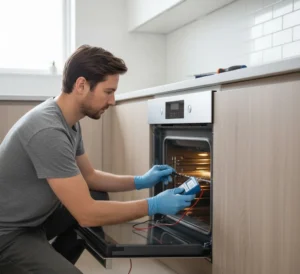
Step 7: Make Electrical Connections
Once the oven is in place but not fully secured, access the junction box or wiring panel. Connect wires according to the manufacturer’s color codes:
- Black (L1) to oven black lead
- Red (L2) to oven red lead
- White (neutral) to neutral terminal (if required)
- Green or bare wire to ground screw
Use wire connectors or nuts and ensure all connections are tight and insulated. Always include strain relief for safety. If your oven uses a plug, insert it into a grounded outlet rated for the correct amperage. Proper wiring is central to installing a wall ovens step by step with safety and reliability.
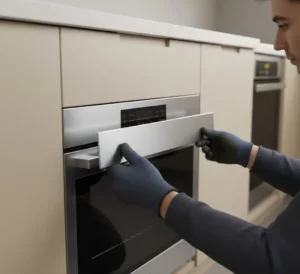
Step 8: Secure the Oven and Attach Trim/Faceplate
Once the wiring is done, gently push the oven fully into place. Align the mounting holes on the oven’s side or faceplate with the cabinet openings. Use the provided screws to secure the oven, tightening evenly without over-torquing. Attach the trim kit or faceplate to cover gaps and complete the built-in look. Proper sealing helps airflow and prevents heat loss, another key detail in installing a wall ovens the right way.
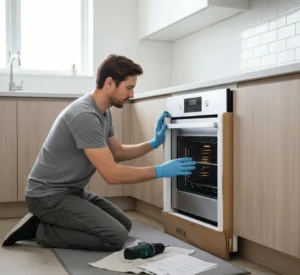
Step 9: Reconnect Power, Test Functions & Calibrate
Turn the circuit breaker back on. Power up the oven and check for lights or display indicators. Run a self-test cycle or preheat to confirm both elements work correctly. Use an oven thermometer to verify accurate heating. During your first use, you may notice a slight odor that’s normal for new units. Testing thoroughly completes your install wall oven step by step guide.
Step 10: Final Checks and Cleanup
Inspect all surrounding surfaces to ensure the oven sits level and sealed. Check for any exposed wiring or unsealed edges. Dispose of packaging materials properly and record your oven’s serial number for warranty purposes. Once everything looks good, your installing a wall ovens project is officially complete and you’ve done it safely, efficiently, and professionally.
Safety Checks & Troubleshooting After Install: How to Install a Wall Oven the Right Way
After completing your how to install a wall oven setup, it’s crucial to perform a few safety checks before you start cooking. These post-installation steps ensure your unit runs efficiently and safely for years to come.
Read Error Codes and Observe First Startup
When you first power on the oven, the control panel may display messages or symbols. Refer to the user manual to understand what each code means. Many models perform an automatic self-check during startup. If you see an error code, don’t panic. It’s often a minor issue like an unlatched door or incomplete calibration. Reading and interpreting these codes is an important final part of learning to install wall ovens step by step correctly.
Pro Tip: If the oven doesn’t power up at all, double-check that the breaker is on and the wiring connections are secure.
Electrical Safety Checklist
Run through this quick checklist to confirm everything is safe:
- No sparks or burning smell when powering on
- Circuit breaker remains steady (no tripping)
- Control panel lights up properly
- No exposed or pinched wires behind the oven
- Oven heats up without unusual noise or vibration
If any of these checks fail, turn off power immediately and inspect your wiring or call a licensed electrician. Safety verification is a non-negotiable step in installing a wall ovens properly.
Troubleshooting Common Post-Install Issues
Even with careful installation, small issues can appear. Here’s how to handle them:
- Oven won’t heat: Check if both legs of the 240V power supply are connected. One missing leg means no heat.
- Breaker keeps tripping: This usually signals a short or overloaded circuit, verifies wire connections and ensures a dedicated circuit.
- Door misaligned: Adjust the mounting screws slightly or re-seat the oven to even out the cabinet frame.
- Display not working: Confirm that the control harness is properly connected and that the fuse (if any) hasn’t blown.
Troubleshooting early ensures your install wall oven step by step process is safe, compliant, and fully functional.
Tips & Best Practices for How to Install a Wall Oven
Whether you’re a first-time DIYer or improving your technique, these tips will make your installing a wall ovens experience smoother, safer, and more professional.
Reinforce Cabinet Weight Support
Wall ovens can weigh anywhere from 100 to 200 pounds. Always add wooden blocks or metal brackets beneath the cabinet base to prevent sagging. A sturdy foundation ensures the oven stays level and secures a key step when learning to install wall ovens step by step for long-term durability.
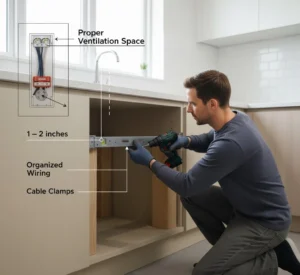
Maintain Proper Ventilation and Clearance
Heat buildup can damage cabinets or cause poor performance. Maintain at least 1–2 inches of space behind and above the oven for air circulation. Follow the manufacturer’s clearance specifications to avoid overheating and improve energy efficiency. Good ventilation isn’t optional, it’s a best practice that defines a safe and successful installation of a wall ovens project.
Keep Wiring Organized and Strain-Free
During installation, avoid sharp bends or pinching electrical wires. Use cable clamps to keep connections tidy and prevent tension at the junction box. Proper strain relief ensures the wires don’t loosen or overheat during operation, a professional touch that completes your install wall oven step by step process.
Schedule Maintenance & Regular Checks
Plan to inspect your oven every six months:
- Test heating consistency
- Check door seal integrity
- Clean vents and fan openings
- Confirm electrical connections are secure
Preventive maintenance extends your oven’s lifespan and supports everything you’ve learned about installing a wall ovens the safe, correct way.
Save Receipts and Document the Installation
Keep all receipts, manuals, and warranty cards in a labeled folder. Take photos of the wiring setup and serial number tag for reference. This record helps in future service calls or warranty claims, a small but smart finishing step for your installing a wall ovens guide.
Common Mistakes to Avoid When Learning How to Install a Wall Oven
Even experienced DIYers can make errors when figuring out how to install a wall oven. These mistakes can lead to poor performance, safety risks, or costly repairs. Avoid the following to ensure a professional-quality installation.
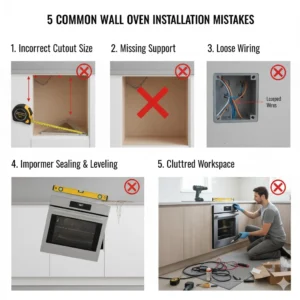
Incorrect Cutout Dimensions or Poor Measurements
One of the biggest mistakes in any install wall oven step by step project is failing to measure accurately. If your cabinet cutout is too small, the oven won’t fit; too large, and it’ll leave gaps or uneven alignment.Tip: Measure three times width, height, and depth and double-check against your model’s specs before cutting or reinforcing cabinetry.
Skipping Cabinet Reinforcement for Heavy Units
Wall ovens are heavy appliances, and weak cabinetry can warp or crack over time. Always reinforce the base or side panels with sturdy wood blocks or metal brackets. Proper reinforcement is essential for anyone learning to install a wall ovens safely; it ensures the oven sits securely and prevents long-term damage.
Loose or Improper Electrical Connections
A loose wire or incorrect connection can trip breakers, short out the oven, or pose an electrical hazard. Always ensure wire nuts are tight, color codes match (black to black, red to red, green to ground), and strain relief is installed. If you’re unsure, hiring a professional electrical safety is a top priority in every step by step process.
Using a Shared or Non-Dedicated Circuit
Your wall oven needs its own dedicated 240V circuit to operate safely and efficiently. Connecting it to a shared line with other appliances can cause overheating and power issues. A dedicated breaker ensures steady voltage and protects both the oven and your home’s wiring, a non-negotiable rule in installing a wall ovens properly.
How to Broil in the Oven | Easy Beginner Guide
Ignoring Ventilation and Clearance Requirements
Poor airflow can cause the oven to overheat and damage surrounding cabinetry. Always leave the manufacturer’s recommended clearance at the back, top, and sides of the oven. Proper ventilation keeps your unit efficient and prevents long-term heat damage, a crucial but often overlooked step in the install wall oven step by step process.
FAQs: Common Questions About How to Install a Wall Oven
Q1: Do I need a licensed electrician to install a wall oven?
If your oven is hardwired (no plug), yes most electrical codes require a licensed electrician. However, if your oven uses a plug-in connection and a dedicated outlet already exists, you can follow how installing a wall ovens guide you safely.
Q2: Can I install a wall oven alone, or do I need help?
Wall ovens are heavy and awkward to lift safely. It’s best to have at least one helper during the install wall oven step by step process. Lifting alone risks damage to the unit or injury.
Q3: What breaker size do I need for a typical wall oven?
Most standard electric wall ovens require a 30–50 amp breaker depending on model and wattage. Always checking the manufacturer’s label or manual breaker size is critical to understanding installing a wall ovens correctly.
Q4: How high should I place a wall oven?
The ideal height is so the oven door handle aligns roughly with your waist or mid-chest level. This allows safe access without bending or reaching. Proper placement is a small but key detail in any install wall oven step by step project.
Q5: How do I know if my cabinet can support the oven weight?
Check your oven’s specifications for weight (typically 100–200 lbs) and confirm your cabinet is made from solid wood or reinforced plywood. If there’s any flexing, add support braces before continuing your installation of a wall ovens setup.
Q6: What if my oven is a gas-electric combo?
Combo ovens require both gas and electrical connections. For gas lines, always contact a licensed gas technician and never attempt it yourself. Follow this guide only for the electrical portion of installing a wall ovens step by step safely.
Q7: How long before my oven reaches operating temperature?
Most electric wall ovens take 10–15 minutes to preheat depending on the model and temperature setting. Run an initial test bake after installation to confirm consistent heating as part of your install a wall ovens completion steps.
Q8: Will improper installation void my warranty?
Yes. Most manufacturers require that the oven be installed to local code and by a qualified technician if hardwired. Skipping electrical standards or ignoring clearances can void coverage — so follow each install wall oven step by step carefully and keep all receipts for proof of compliance.
Conclusion: Final Thoughts on How to Install a Wall Oven
You’ve now learned exactly how to install a wall oven from measuring your cabinet and wiring safely to securing and testing your new appliance. Following this install wall oven step by step guide ensures your oven runs efficiently, looks professional, and complies with safety standards.
Quick Recap:
- Measure your cabinet cutout carefully before starting.
- Always turn off the power and confirm electrical safety with a multimeter.
- Reinforce your cabinet to support the oven’s weight.
- Connect wiring securely and follow the manufacturer’s color codes.
- Test all functions before your first bake.
Installing a wall oven might seem intimidating at first, but with patience, precision, and the right tools, it’s absolutely manageable for a beginner. Remember safety comes first. If you ever feel uncertain about the electrical connection or circuit load, contact a licensed electrician.
Next Steps:
- Download the printable checklist below to stay organized.
- Review your oven manual for any model-specific instructions.
- Enjoy your newly installed oven and the satisfaction of a job well done.