Each of these methods is safe, effective, and beginner-friendly and once you try one, you’ll realize how to clean oven racks doesn’t need to be complicated or exhausting.
Pro Tip: If you’re cleaning your racks for the first time, start with the baking soda and vinegar soak. It’s gentle, non-toxic, and one of the most reliable ways to learn how to clean oven racks without chemicals or special tools.
Before You Start: Prep & Safety
Before jumping into the actual steps of how to clean oven racks, it’s important to prepare properly. A few minutes of setup ensures your cleaning is safe, effective, and mess-free.
Pre-Clean Checklist
- Turn off and cool the oven completely.
Never start cleaning when the oven is still warm it’s not only unsafe, but it can make grime harder to remove. - Remove the oven racks carefully.
Slide each rack out slowly to avoid scratching your oven walls or bending the metal. - Inspect your racks’ material.
- Chrome or bare metal: Safe for scrubbing and soaking.
- Porcelain, enamel, or coated racks: Avoid abrasive tools harsh scrubbing can chip or dull the coating.
- Chrome or bare metal: Safe for scrubbing and soaking.
- Protect your workspace.
Lay down old towels or plastic sheeting if you’re cleaning in a bathtub, or take the racks outside for chemical-based methods.
Knowing the type helps you choose the right approach for how to clean oven racks safely and without damage.
Safety & Ventilation
Cleaning oven racks often involves strong cleaners or chemical reactions (like vinegar and baking soda fizzing). Always take a few precautions to stay safe:
- Wear gloves and goggles to protect your skin and eyes from splashes and irritation.
- Keep your space ventilated. Open windows [How to Clean Oven Window] or turn on fans, especially if using ammonia or commercial cleaners.
- Never mix cleaning products. Mixing ammonia with bleach or other chemicals can create toxic fumes.
- Keep kids and pets away while you clean, especially if using stronger products.
Good airflow and basic protection make how to clean oven racks safer, cleaner, and more comfortable.
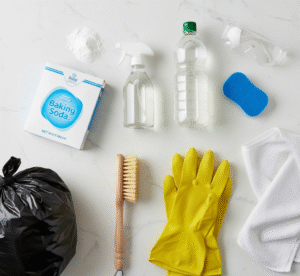
 Supplies & Tools You’ll Need
 Supplies & Tools You’ll Need
Here’s your cleaning toolkit most of these items are common household supplies:
- Baking Soda: Gentle, natural cleaner that breaks down grease.
- White Vinegar: Works with baking soda to lift stubborn buildup.
- Large Garbage Bag (Heavy-Duty): Essential for the ammonia bag method.
- Ammonia (Clear Household Type): Cuts through heavy grease; use outdoors or with strong airflow.
- Commercial Oven Cleaner: Fast and powerful option for baked-on grime.
- Dish Soap / Degreaser: Perfect for light to medium cleaning.
- Scrub Brushes (Soft & Medium): For loosening grime without scratching.
- Non-Scratch Scrubbing Pad: Great for coated racks and general cleaning.
- Steel Wool (Fine Grade): Only for bare metal racks or rust removal never on coated surfaces.
- Spray Bottle: Handy for vinegar, water, or diluted cleaners.
- Old Towels / Rags: To dry racks or protect surfaces.
- Bucket or Tub: For soaking racks if your sink or bathtub is unavailable.
- Gloves, Goggles, and Mask (optional but recommended): For chemical safety and comfort.
Pro Tip: Having these ready will make your cleaning routine faster and far more efficient. You’re now set to learn how to clean oven racks using one of the five proven methods that follow.
Step-by-Step Guide – 5 Proven Methods
There’s no single “best” way to clean oven racks. It depends on how dirty they are, how much time you have, and whether you prefer natural or chemical cleaners. Below are five tried-and-true methods that cover every situation from gentle, overnight soaks to quick chemical cleanups.
Method 1: Baking Soda + Vinegar Soak (Best All-Round DIY, Non-Toxic)
 Method 1: Baking Soda + Vinegar Soak (Best All-Round DIY, Non-Toxic)
Time & Difficulty: Overnight (6–12 hours) | Easy–Medium
Best For: Light to heavy grease buildup, eco-friendly cleaning
Step-by-Step
- Place racks in a tub or large container.
Rinse off loose crumbs or debris first to make cleaning more effective. - Sprinkle baking soda generously over each rack.
Use about ½ cup to 1 cup depending on size and focus on greasy spots. - Add hot water until racks are submerged.
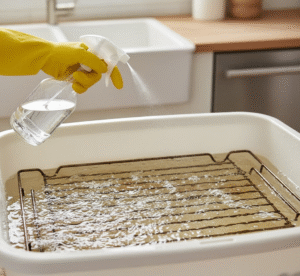
Let them soak for at least 4–8 hours or overnight. The warm water activates the baking soda to loosen grime. - Pour or spray white vinegar over the racks.
The fizzing reaction helps lift baked-on grease and food residue. - Scrub with a non-scratch pad or soft brush.
Focus on corners and crossbars. For stubborn spots, reapply baking soda paste. - Rinse thoroughly with warm water and dry.
Use a towel to wipe off any remaining residue and leave racks to air dry. - Reinstall racks once fully dry.
Oven Racks Cleaning Tips
- Add a little dish soap to the soaking water for extra degreasing power.
- For tight spaces or corners, use an old toothbrush.
- Repeat the soak monthly to avoid heavy buildup later.
Safety Notes
Completely safe for all materials just avoid metal brushes on coated or enamel racks.
Method 2: Ammonia-in-Bag Method (Powerful Overnight Option)
 Method 2: Ammonia-in-Bag Method (Powerful Overnight Option)
Time & Difficulty: Overnight (8–12 hours) | Easy but requires caution
Best For: Very stubborn, burnt-on grime and grease
Step-by-Step
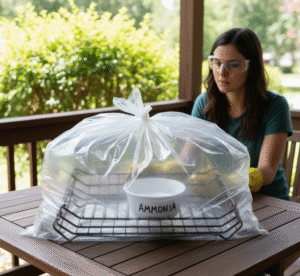
- Place oven racks into a heavy-duty garbage bag.
Do this outside or in a well-ventilated area. - Add ½ cup of household ammonia inside the bag.
Keep it in an open container, do not pour it directly on the racks. - Seal the bag tightly and leave it overnight.
The fumes, not the liquid, do the cleaning work. - Open the bag outdoors or near an open window.
Let it air for a minute before removing racks. - Rinse and scrub lightly with a soft brush.
The grime should wipe off easily after soaking in the fumes. - Rinse thoroughly and dry.
Safety & Warnings
- Always wear gloves and goggles.
- Never mix ammonia with bleach or other cleaners.
- Keep children and pets away from the area.
Alternative
If you prefer to avoid ammonia, use the baking soda soak or commercial oven cleaner instead.
Method 3: Commercial Oven Cleaner (Fast, Strong Chemical Option)
 Method 3: Commercial Oven Cleaner (Fast, Strong Chemical Option)
Time & Difficulty: 30–60 minutes | Medium
Best For: Heavy baked-on residue when you need fast results
Step-by-Step
- Read the product label carefully.
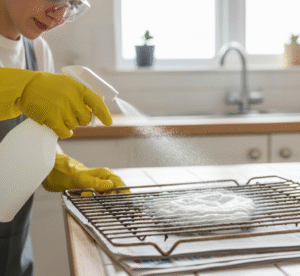
Different brands have unique instructions and always follow safety directions. - Wear gloves and goggles, and ventilate your workspace.
Open windows or turn on exhaust fans. - Lay the racks on old towels, plastic, or newspaper.
This prevents chemical overspray from damaging floors or countertops. - Spray the cleaner evenly across all rack surfaces.
Ensure full coverage, especially in corners and edges. - Let the cleaner sit for the recommended dwell time (usually 20–40 minutes).
- Scrub lightly using a brush or non-scratch pad.
Most grime will lift easily at this point. - Rinse thoroughly with warm water and dry.
Product Safety
Always ventilate well, avoid contact with skin or eyes, and dispose of chemical waste responsibly.
Method 4: Hot Water + Dish Soap Soak (Gentle & Accessible)
 Method 4: Hot Water + Dish Soap Soak (Gentle & Accessible)
Time & Difficulty: 1–4 hours | Easy
Best For: Light to medium grease buildup, general maintenance
Step-by-Step
- Fill a large tub, sink, or bathtub with very hot water.
Add a generous squirt (2–3 tablespoons) of dish soap or a degreasing detergent. - Submerge oven racks fully.
If they float, weigh them down with a towel or heavy bowl. - Soak for 1–4 hours.
The heat and detergent loosen most grime and oil. - Scrub with a soft brush or sponge.
Focus on sticky spots and corners. - Rinse thoroughly and dry.
Pro Tip: Add ½ cup of vinegar for a mild degreasing boost and shine.
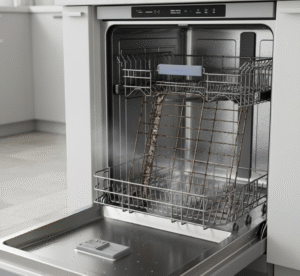 Method 5: Dishwasher Method (Easiest if Racks Fit)
Time & Difficulty: 1–3 hours | Very Easy
Best For: Lightly soiled racks or quick maintenance
Step-by-Step
- Check manufacturer’s guidance.
Some coated racks are not dishwasher-safe and may discolor. - Wipe off loose debris first.
Use a damp cloth or paper towel to remove crumbs and grease. - Place racks on their side or in the bottom of the dishwasher.
Make sure they fit without blocking spray arms. - Run a heavy-duty or pots-and-pans cycle.
Use your regular detergent with no need for special products. - Inspect after the cycle and spot-clean if needed.
- Dry completely before reinstalling.
Pro Cleaning Tip:
For best results, deep clean your oven racks every 3–6 months and do a quick wipe-down after messy cooking sessions. These oven racks cleaning tips will keep your oven looking and smelling fresh year-round.
Spot Cleaning, Rust & Tough Stains
 Spot Cleaning, Rust & Tough Stains
Even after soaking or scrubbing, you might notice a few stubborn spots that won’t budge. These final touches will help you remove what’s left safely and effectively without damaging your racks.
Steel Wool / Scraping (Only for Bare Stainless Steel)
Sometimes a gentle scrape is the only way to tackle carbonized grease or burnt-on food. However, this method must be done with care.
How to do it safely:
- Confirm your rack type.
Use this method only on bare stainless steel racks, never on porcelain, enamel, or nonstick coatings, which can scratch or chip easily. - Use fine-grade steel wool or a metal scraper.
Opt for “0000” (super fine) steel wool. Lightly buff the stained areas in small, circular motions. - Rinse and inspect frequently.
Stop as soon as the buildup loosens excessive scrubbing can dull the metal. - Finish with a vinegar wipe.
Spray white vinegar afterward to remove residue and restore shine.
Pro Tip: Always test a small, hidden area first before going all in. Gentle pressure works better than force.
Rust Removal Methods
If you notice orange or brown rust patches, don’t panic, you can often restore your racks completely.
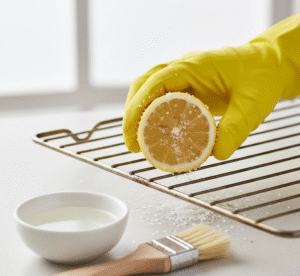
Option 1: Lemon + Salt Scrub (Natural Fix)
- Cut a lemon in half and dip it in table salt.
- Scrub the rust spot directly using circular motions.
- Let it sit for 10 minutes, then rinse and dry.
Option 2: Vinegar Soak
- Lay the rack flat in a shallow pan or bathtub.
- Pour white vinegar over the rusted sections and let soak for 2–3 hours.
- Use a soft brush or cloth to wipe clean, then rinse thoroughly.
Option 3: Commercial Rust Remover
- Choose a kitchen-safe rust remover.
- Apply according to the label, wearing gloves and working in a ventilated space.
- Rinse well and dry immediately.
Pro Tip: After rust removal, always dry your racks completely (see next section) to prevent the rust from returning.
When to Replace a Rack
Sometimes, cleaning isn’t enough and replacing the rack is the safer choice. Consider replacement if:
- The rack is severely rusted or pitted.
- The coating is chipped or peeling, especially if food touches it.
- The rack is warped or bent, making it hard to slide in or out.
- It has sharp edges or broken welds from corrosion.
If you need replacements, check your oven’s model number (usually inside the door frame) and order directly from the manufacturer or verified parts supplier.
Post-Clean: Drying, Reinstalling & Maintenance
Once you’ve learned how to clean oven racks properly, the final step is making sure they’re dried, reinstalled, and maintained correctly. This simple care routine prevents rust, keeps your racks shining, and ensures your oven runs smoothly for years to come.
How to Dry Completely (to Avoid Rust)
Even a small bit of leftover moisture can cause rust over time especially on bare metal racks.
Here’s how to dry them right:
- Wipe immediately with an old towel or microfiber cloth.
- Air-dry fully before reinstalling. You can stand the racks upright near a fan or sunny window for faster results.
- Optional: Wipe with a few drops of cooking oil on a paper towel this creates a light protective barrier that resists rust (especially for stainless steel).
Pro Tip: If you’ve just completed a deep cleaning session, this drying step is crucial for maintaining the results of how to clean oven racks safely and effectively.
Reinstall Tips (Align Rails & Check Fit)
Putting your racks back properly ensures smooth sliding and even cooking.
- Check the rail grooves before reinstalling to remove crumbs or residue first.
- Align each rack carefully with the rail slots and slide it in evenly on both sides.
- Test movement racks should glide smoothly without sticking or tilting.
- If your racks have a stop notch, angle slightly upward when inserting, then level out to lock into place.
Pro Tip: Keep your top rack cleaner for baking and the lower rack for roasting it helps distribute wear and keeps one in better shape longer.
Preventative Care & Oven Racks Cleaning Tips
Keeping your racks clean is easier when you maintain them regularly. These simple oven racks cleaning tips help prevent heavy buildup so you won’t need deep scrubbing as often.
- Wipe regularly: After cooking messy dishes, wipe racks with a damp cloth once they cool.
- Use drip trays or foil liners: Catch spills from casseroles or pies but avoid blocking airflow completely.
- Monthly mini clean: Run a quick 30-minute soak with hot water and dish soap once a month.
- Avoid the self-cleaning cycle (for most racks): High heat can discolor or warp racks. Always remove them unless the manufacturer says otherwise.
- Quick refresh: Spray vinegar and wipe down weekly for shine and odor control.
By following these oven racks cleaning tips, you’ll make your next deep clean much easier and keep your oven performing efficiently without having to relearn how to clean oven racks every few months.
 Common Mistakes to Avoid
 Common Mistakes to Avoid
Cleaning oven racks isn’t complicated but a few common mistakes can damage your racks, your oven, or even your health. Here’s what to watch for:
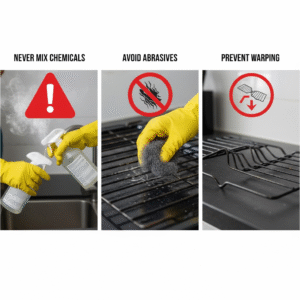
1. Mixing Cleaners (Especially Ammonia + Bleach)
Never combine cleaning chemicals especially ammonia and bleach, which create toxic fumes that are dangerous to inhale.
Stick to one cleaner at a time, and always rinse thoroughly before switching products.
2. Using Abrasive Tools on Coated Racks
Avoid steel wool or metal brushes on porcelain, chrome, or enamel-coated racks.
These coatings can scratch easily, leading to rust and flaking.
Instead, use a soft sponge, nylon scrubber, or an old toothbrush for safe scrubbing.
3. Skipping Ventilation During Chemical Cleaning
When using commercial oven cleaners or ammonia, always clean in a well-ventilated area.
Open windows or take the process outdoors if possible fumes can cause headaches or irritation.
4. Leaving Racks in the Self-Cleaning Oven
Many people assume self-clean mode will clean the racks too but that’s a mistake.
High heat can discolor, warp, or crack coatings on the racks.
Unless your oven manual specifically says otherwise, remove all racks before running a self-clean cycle.
5. Rushing & Leaving Cleaner Residue
Incomplete rinsing leaves chemical residue behind, which can smoke or smell during cooking.
After cleaning, always rinse thoroughly with warm water and wipe dry completely before reinstalling the racks.
Bonus Tip: Label or remember which rack slot goes where.
Some ovens have slightly different rail fits reinstalling racks in the same position ensures smooth sliding and even cooking.