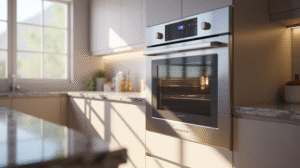
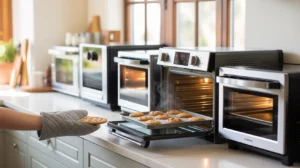
If you’ve ever dreaded scrubbing baked-on grease from your oven walls, you’ll love learning how to use self clean oven features the right way. This smart function saves you hours of hard cleaning by heating the oven to a very high temperature, turning grease and food spills into light ash that you can easily wipe away.
In this simple guide, we’ll walk you through how to use self clean oven step by step, from preparing your kitchen and removing racks to starting the cycle safely and cleaning up afterward. You’ll also discover helpful self clean oven instructions, safety tips, common mistakes to avoid, and answers to the most asked questions.
Whether it’s your first time using it or you just want a refresher, understanding how to use self clean oven correctly helps keep your appliance running efficiently and your cooking environment healthier. Always check your oven’s manual for model-specific instructions before starting the self-clean cycle.
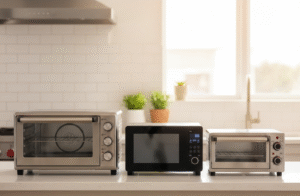
5 Best Oven Thermometer 2026 – Accurate Picks
 Quick Overview: What “Self-Cleaning” Means
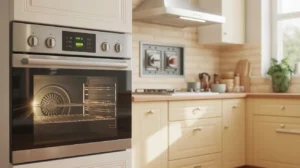
Before we dive into how to use self clean oven, it helps to understand what the self-clean function actually does. A self-cleaning oven uses intense heat or special coatings to burn off or absorb food residue inside the cavity, leaving a fine ash you can easily wipe away.
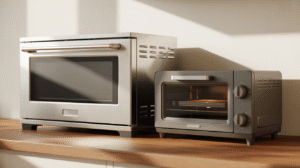
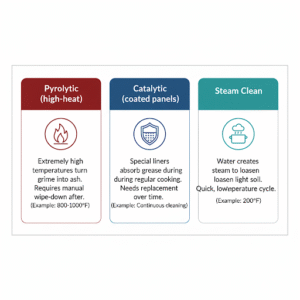
Types of Oven Cleaning
- Pyrolytic (High-Heat Auto-Clean):
This is the most common type found in modern ovens. It heats up to around 900°F (480°C) to burn off grease and spills, turning them into ash. - Catalytic Panels (Coated Liners):
These panels are designed with a special coating that absorbs grease during regular cooking. You’ll still need to wipe them occasionally, but no extreme heat cycle is required. - Steam / Water-Based Clean:
A gentler method that uses steam and lower heat to loosen grime. It’s great for quick cleanups or when you prefer not to run a long, hot self-clean cycle.
How Self-Cleaning Works
In simple terms, your oven locks its door and heats to a very high temperature. During this time, grease and leftover food particles are burned into fine gray ash. Once the oven cools, you can follow the self clean oven instructions by wiping away the ash with a damp cloth, no harsh chemicals or scrubbing needed.
Understanding this process makes it much easier to follow the correct steps when learning how to use self clean oven safely and effectively.
Safety & Quick Prep
Before you start learning how to use self clean oven, it’s important to take a few safety precautions. The self-cleaning function runs at extremely high temperatures, so preparing your space and following your self clean oven instructions carefully helps prevent damage or discomfort.
Key Safety Rules
- Ventilation is essential:
Always open windows or switch on your exhaust fan to keep the air fresh. The high heat may release light smoke or odors as residue burns away. - Keep children and pets away:
The exterior of your oven can get very hot during cleaning. Make sure kids and pets stay out of the kitchen until the cycle and cool-down are fully complete. - Avoid flammable products:
Never use oven sprays, liners, or harsh chemicals before or during the self-clean cycle. They can cause fumes or even small fires when exposed to extreme heat.
When Not to Use the Self-Clean Feature
There are a few situations where you should skip using the self-clean option:
- If your oven has delicate electronic parts that may overheat.
- When there are heavy chemical residues from commercial cleaners still inside.
- If your manufacturer’s guide advises against running self-clean for long cycles.
When in doubt, it’s always safer to do a manual or steam clean instead.
Check Your Oven Manual & Warranty Notes
Every model is different, so before you test how to use self clean oven, review your manual or the brand’s website for self clean oven instructions specific to your make and model.
Some warranties don’t cover damage from improper use of the self-clean function, so reading those notes first can save you time, money, and repairs later.
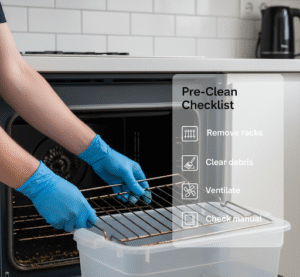 What You Need: Prep Checklist
Before you press that button, gather a few basics and prep your oven.
Tools & Supplies
- Rubber gloves (for handling racks and ash afterward)
- Damp microfiber cloths or sponges
- Oven mitts (for handling hot parts later)
- Small garbage bag or container for debris
- Bucket with warm water + mild dish soap (for post-clean wipe-down)
Quick Pre-Check List
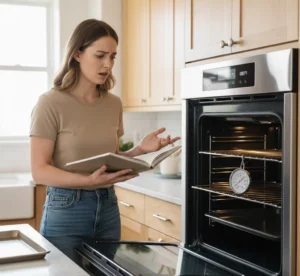
- Remove foil, cookware, trays, or thermometers, they aren’t safe for self-clean cycles.
- Take out any plastic or silicone items accidentally left inside.
- Wipe away large spills or chunks of food with a damp cloth to reduce smoke.
Note on Racks
Whether racks stay in or out depends on your oven model.
- Standard chrome racks often need to be removed, as the extreme heat can discolor or warp them.
- Porcelain-coated racks may be safe to leave inside, but always confirm with your manual.
Step-by-Step Guide: How to Clean Oven Window Inside
Learning how to use self clean oven the right way keeps your appliance sparkling without harsh chemicals. Follow these self clean oven instructions carefully to ensure a safe, complete clean that protects your oven’s interior and saves you effort later.
Step 1: Read Your Manual & Choose the Right Mode
- Always start by checking your oven’s manual, every brand has slightly different self clean oven instructions.
- Select the cleaning cycle that matches your mess:
- Quick / Light Clean: for minor spills
- Normal Clean: standard grease and splatter
- Heavy / Pyrolytic Clean: baked-on grime and burnt residue
- Quick / Light Clean: for minor spills
- Reading your manual first ensures you understand exactly how to use self clean oven safely for your specific model.
 Step 2: Clear the Oven Interior
- Remove all oven racks, trays, foil, and accessories unless your manual says otherwise.
- Chrome racks can warp or discolor under extreme heat.
- Take out any thermometers or probes.
- Doing this step correctly is a big part of how to use self clean oven safely and effectively.
Step 3: Spot-Clean Big Spills First
- Before you start the cleaning cycle, wipe away heavy grease or food chunks with a damp cloth or scraper.
- This reduces smoke and helps the self-clean process work more efficiently.
- Think of this as prepping your oven for its “deep clean.”
- Even though you’re learning how to use a self clean oven, a little prep goes a long way to make the results perfect.
Step 4: Lock the Door & Start the Cycle
- Once your oven is clear, close the door securely, many models auto-lock during cleaning.
- Select your desired cycle and press start.
- Never try to open the door once the cycle begins; the oven reaches very high heat (up to 900°F).
- This step is central to how to use self clean oven correctly and safely.
Step 5: Ventilate & Monitor the Kitchen
- Open windows or run your exhaust fan to keep air fresh, a mild odor or light smoke is normal.
- Stay nearby while the cycle runs, but don’t leave pets or children close to the oven.
- Avoid using other heat-producing appliances at the same time.
- Proper ventilation is a key detail in how to use self clean oven for best results.
Step 6: Let the Oven Cool Completely
- Once the self-clean cycle finishes, don’t force the door open. The oven door unlocks automatically after cooling, usually 1–2 hours later.
- The cooling process is vital for safety and to protect internal components.
- Patience is part of mastering how to use self clean oven without damage or overheating.
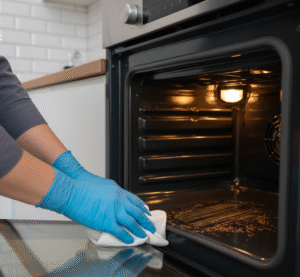
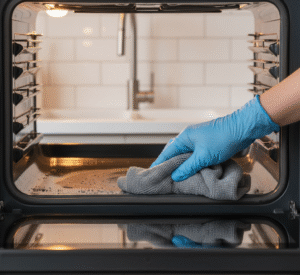
Step 7: Wipe Away Ash After Cleaning
- When the oven is cool, use a damp sponge or microfiber cloth to wipe away fine gray ash.
- Avoid using harsh cleaners, plain water is enough.
- For stubborn residue, a bit of baking soda paste can help without scratching.
- This final step completes your how to use self clean oven process with a spotless finish.
 Step 8: Replace Racks & Final Checks
- Clean your racks separately using mild soap and warm water before putting them back.
- Inspect the door seal and glass for any cracks or leftover ash.
- Confirm all buttons and lights are functioning properly after cooling.
Aftercare & Maintenance
Running the self-clean cycle doesn’t mean you can ignore your oven until the next big mess. A little routine care will keep it cleaner for longer and help your oven last.
How to Clean Oven Racks Easily | 5 Simple Methods
- How often to self-clean: For most households, running the self-clean cycle every 6–12 months is plenty. If you bake or roast frequently and deal with more grease, you may need it a bit more often. Overusing self-cleaning isn’t necessary and can put extra wear on the oven.
- Wipe spills right away: After cooking, once the oven has cooled, quickly wipe away any drips or crumbs with a damp cloth. This prevents buildup and reduces smoke next time you cook.
- Keep the gaskets clean: The rubber seal around the door (the gasket) is important for keeping heat inside. Gently wipe it down with a damp cloth every so often to prevent food from sticking.
- For gas ovens: Occasionally check that the ignition area and vents are free from grease. Never block these parts, as they’re vital for safe operation.
- Long-term habits: Use covered roasting pans to catch drips, place a baking sheet under pies or casseroles, and avoid using foil on the oven floor (it can damage the liner). These habits reduce the need for frequent deep cleans.
Tips for Best Results
- Use the short/light cycle for small crumbs and minor stains; choose a longer cycle for heavy, baked-on grease.
- Avoid oven liners or foil on the bottom of the oven, they can melt, damage the enamel, or block airflow.
- Use roasting or baking pans with rims to prevent spills from dripping directly onto the oven floor.
- If your oven has a steam clean option, use it for lighter messes or in between full pyrolytic cycles. It’s quicker and gentler.
Common Mistakes to Avoid
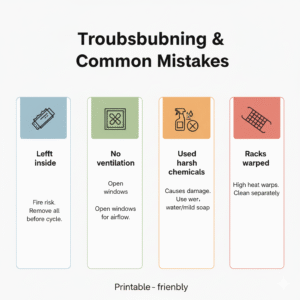
- Even if you’ve learned how to use self clean oven correctly, a few small mistakes can still lead to odors, damage, or poor cleaning results. Avoid these common slip-ups to keep your oven running safely and efficiently:
Leaving Non-Heat-Safe Items Inside
- Always remove foil, thermometers, liners, or pans before starting the cycle. These materials can melt or warp, damaging the oven interior or creating toxic fumes.
Failing to Ventilate
- Forgetting to open windows or use an exhaust fan can cause smoke buildup and discomfort. Proper ventilation keeps the air clean and prevents lingering odors in your kitchen.
Using Harsh Chemicals After Cleaning
- Right after a pyrolytic self-clean cycle, the oven surface is still porous and warm. Spraying oven cleaners or harsh chemicals immediately can damage the enamel finish and release fumes. Always let it cool completely before wiping.
Ignoring Discolored Racks
- If your racks darken or lose shine, don’t panic, it’s cosmetic, not a sign of damage. Many users worry this means something went wrong, but it’s a normal effect of high heat.
 Troubleshooting
Even when you follow the instructions, little hiccups can happen. Here are some quick answers to common problems:
- Oven won’t start self-clean
- Make sure the door is fully closed and latched. Most ovens won’t start unless the lock engages.
- Check if the child lock/safety lock is on. Turn it off before starting.
- Confirm the oven is properly plugged in and the circuit breaker hasn’t tripped.
- Make sure the door is fully closed and latched. Most ovens won’t start unless the lock engages.
- Strong smoke during the cycle
- A little smoke is normal if there’s grease inside, but heavy or dark smoke means there’s too much residue.
- Switch on extra ventilation (hood fan, windows).
- If smoke is overwhelming, cancel the cycle once safe, let the oven cool, wipe out the debris, and try again later with a shorter cycle.
- A little smoke is normal if there’s grease inside, but heavy or dark smoke means there’s too much residue.
- Door won’t unlock after cycle
- Be patient, ovens stay locked until they are completely cool, which can take a couple of hours.
- If it’s still locked after cooling, check your manual. Some models have a manual release lever inside the control panel or under the oven.
- If nothing works, call the manufacturer or a professional technician. Do not force the door open.
- Be patient, ovens stay locked until they are completely cool, which can take a couple of hours.
- Racks discolored or warped
- Discoloration is normal for racks left inside during high-heat cleaning. They’re still safe to use, even if they lose shine.
- Warped racks, however, may not sit correctly and should be replaced. Consider cleaning racks separately with soapy water in the future to avoid this.
- Discoloration is normal for racks left inside during high-heat cleaning. They’re still safe to use, even if they lose shine.
How to Cook Steak in the Oven Without a Cast Iron Pan
When Self-Clean Is Not the Best Option (Alternatives)
Sometimes the self-clean cycle isn’t the right choice. Here’s when to consider other methods:
- Gas ovens (extra precautions)
- Gas ovens can produce more fumes during self-cleaning, so ventilation is even more critical.
- Always double-check the manufacturer’s recommendations, in some cases, it’s safer to avoid self-clean altogether and use gentler cleaning methods.
- Gas ovens can produce more fumes during self-cleaning, so ventilation is even more critical.
- Heavy grease or commercial messes
- If your oven has layers of thick, greasy buildup (especially in a rental or restaurant-style oven), self-cleaning may cause excessive smoke or even fire risk.
- In this case, hire a professional oven cleaner or carefully do a manual scrub before running self-clean.
- If your oven has layers of thick, greasy buildup (especially in a rental or restaurant-style oven), self-cleaning may cause excessive smoke or even fire risk.
- Manual scrubbing or steam cleaning
- For light, everyday messes, a steam clean cycle or even just placing a bowl of water inside and running the oven at a low temperature can loosen grime.
- A baking soda paste (baking soda + water) is a safe, non-toxic option for scrubbing stubborn spots without harsh chemicals.
- These methods are gentler and often good enough between full self-clean cycles.
- For light, everyday messes, a steam clean cycle or even just placing a bowl of water inside and running the oven at a low temperature can loosen grime.